Wednesday, May 27, 2009

Burning Your DVD Portfolios

Portfolio
(Media share>(Your folder)>Portfolio)
  • MUSIC
    • Song 1 (.wav file)
    • Song 2 (.wav file)
    • Song 3 (.wav file)
    • Pro Tools Sessions
    • Logic Sessions
  • AUDIO POST PRODUCTION
    • Quicktime movie 1
    • Quicktime movie 2
    • Pro Tools Sessions
  • Resume

Burning DVDs
Burning is super easy if you already have everything ready to go. Just follow the instructions below:

1. Log in on the Mac side of your computer (this is the only way to burn your Logic files)
2. Get a blank DVD from the instructor and pop it in.
3. A window should pop up asking you what program you want to open it up with. Choose Finder.
4. Now access the Media Share folder. (Ask the instructor if you don't remember how to do this.)
5. You should now have two windows open, one for the DVD and one for the Media Share. Simply drag and drop your portfolio into the DVD.
6. Hit the Burn button and let it burn, baby burn!!!
7. Eject your DVD and label it with a permanent marker.
8. Show it to friends, prospective employers, your grandma, whoever.

LAST DAY OF CLASS!!!

Alright folks, today is our Last Official Day of Class! It has been an absolute pleasure working with all of you and seeing you grow as artists and producers. I hope that you feel that you've learned something valuable from this experience. We would really like to hear back from you about what your experience with the class has been like. Please take the time to take this quick online survey.

Final Event
Next item of business, let's all email ourselves the info for our Final Event! Please copy the following info into an email and send it to yourself.

Where:
Intersection for the Arts
446 Valencia St. (between 15th & 16th St.)
San Francisco
map

When:
12:00 pm
Sunday, June 7


Please start telling family and friends about our event now! This is will be our last opportunity to get together as a class and to share our work with the world, so we want as big a turnout as possible.

What can you expect from the Final Event? Well, obviously we will be playing all your work for an audience. If you will be performing live, you will have mics to do your thing (don't forget to give me an instrumental of your beat!!!). I will also be asking you to come up to introduce your piece before I play it, and to say a little about what it is, why you chose it, what you were trying to do with it, challenges you dealt with in making it, etc. Then at the end, we will all be coming up as a class and taking questions from the audience.

What else do we need to do to prepare for the Event? Well, of course you need to turn in exported files from your Final Projects.
  • If you are doing an Audio Post piece, please Bounce out a Quicktime movie.
  • If you are doing a Music piece and will not be performing live, then Bounce out an audio file of the whole song (WAV format, Stereo Interleaved, 44,100 Hz, 16 bit).
  • If you are doing a Music piece and will be performing live, then Bounce out audio files of both the full song AND an instrumental version of the song (i.e. Mute all the vocal tracks and bounce the song again).
Important! Please label your files as follows: DPAA_your name_song name and put them into the folder called Final Projects on the Media Share folder (dolly>Media Share>Final Projects)

Wednesday, May 20, 2009

Shooting the Trouble


Today we have 2 main priorities:
  1. We will be doing our Troubleshooting Evaluations, where you show me that you know how to get a basic recording session up and running in Pro Tools.
  2. To make sure we create our Student Profiles on the BAVC blog and get our information in there.
Troubleshooting
So after a quick review, I'm going to have each of you come up and show me how to get a session going. Here are the exact things I'm going to ask you to do, so if you are unsure about any of these, please be sure to ask me to go over them before we get going.

  1. Select vocal and talkback microphones. Set up the vocal mic on the mic stand.
  2. Plug cables and headphones into inputs on the Digi 003.
  3. Create a new Pro Tools session in a designated folder.
  4. Create new audio tracks and label them accordingly.
  5. Get signal from the mics and set good levels.
  6. Adjust headphone levels.
  7. Record a short vocal segment.
  8. Save and close the Pro Tools session.
  9. Transfer the session folder to the Media Share folder.

Profiles
Corina will be helping folks out with their Profiles. It will be helpful to her if you can get a things together beforehand. You will need all the following elements for your profiles:
  • Your Resume
  • A Music File (MP3 format)
  • A Photo
  • A Bio
Let's try to get it done today!!!

Monday, May 18, 2009

Monday, May 11, 2009

**Job Readiness Workshop**

Have you ever had a job?

If so, how did you get it? What was the process? Did you feel as though you were prepared?

Today we're going to be working with Felice on getting ready for our internships. Please ask lots of questions and use this time to really get ready for stepping into the professional world.

Felice will be getting here at about 5:15. Until she gets here, I will be meeting with you individually to discuss where your Final Project is at and what you need to get done.

Wednesday, May 6, 2009

Final Projects_Work Schedules


Unfortunately, Felice had to postpone the Job Readiness workshop until Monday, so please be ready to do this then. In the meantime...

So today you have the whole period to work on your final projects, but as you are doing this, I want you to start thinking about what the different pieces are that you will need to get a really good, polished project ready by the time we have our Final Event.

To help you with this, I have put a document on the Media Share folder (Media Share>Class Materials>Final Project Schedule).

Please drag a copy of this to your folders and open the document. Fill it out and turn it in to the Student Work folder by the end of the class.

Monday, May 4, 2009

Final Projects and Important Dates

Important Upcoming Dates:

  • Wednesday, May 6 - Job Readiness Workshop w/ Felice
  • Friday, May 8 - Makeup class (3-6 pm)
  • Friday, May 15 - Makeup class (3-6 pm)
  • Saturday, May 16 - Our last Saturday class!
  • Monday, May 18 - Peer review presentations
  • Wednesday, May 20 - Troubleshooting Evaluation
  • Monday, May 25 - Memorial Day (no class)
  • Wednesday, May 27 - Last day of class
  • Sunday, June 7 - FINAL EVENT!!!

Final Projects
At the Final Event for this class, everyone will be presenting a Final Project. Starting today, our main focus is going to be in getting these projects completed. This is your chance to make a polished audio project that showcases the skills you have acquired throughout the course of the program. You can decide what you want your project to be, as long as it uses the skills you have learned in this class (recording a song, audio post production, etc.)

Your project should:
  • Be a reflection of your own unique experiences and skills – give me something that no one else in the world can give me!
  • Be at least 5 minutes long
  • It can be more than one project that add up to five minutes
  • Polished, complete and to the best of your ability
  • It should have some type of live recording
  • Include great attention given to the mix (volume, panning, FX, automation)

If you are making a song/spoken word piece...
  • It should have a deliberate arrangement and structure that keeps the listeners interested
  • Vocals: rap, singing, poetry, essay, Speech
  • Complex instrumentation
  • Final piece Exported/Bounced song as an audio file

If you are doing Audio Post Production...
  • All actions and dialogue should have corresponding audio with them - good synchronization, no empty gaps.
  • Should have a musical score that you create
  • Mix the audio - make the actions believable with the use of mixing, panning, FX, and automation.
  • Export/Bounce the final piece as a Quicktime movie
Couple things...
Collaboration is encouraged, but be careful to budget your time accordingly - ESPECIALLY regarding the use of the vocal booth. Be considerate of the fact that everyone needs to have access. You are encouraged to constantly seek peer feedback throughout the production process (formal Peer Review will be happening on May 18).If you have an idea for a project that is different from the two options above, please talk with Chris and/or Corina to discuss how you can make this happen.

Wednesday, April 29, 2009

Logic Express - part 3 (Insert FX)

So today I want you to continue getting familiar with working with the Software Instruments in Logic, but today I would like for you to create a complete piece that you can use to record vocals over next week.

This can be whatever form that works for you, whether you are rapping, singing, or reading a poem or speech. Whatever it is, I would like for it to have a definite structure:
  • If you are doing a song, give me at least 2 Verses, 2 Choruses and an Intro/Outro.
  • If you are doing a poem/speech, I want to have specific musical things happening along with parts of the text.
In addition, I would like to see all of the following elements in the music you produce today:
  1. At least 6-8 instruments in your song.
  2. Use at least 3 different FX on your tracks (1 Delay, 1 Modulation, and 1 of your choice).
FX Plugins
So, in my opinion, one of the best things about Logic is that it has all kinds of instruments and FX that come with the program, and which you can start using right away. Pro Tools, on the other hand, tends to give you a lot fewer tools to start with, but gives you the option of buying them as you start to use the software more.


The FX in Logic actually work the same way that they do in Pro Tools. The easiest way to use them is to Insert them directly onto your tracks. To do this, simply do the following:
  1. Find the Insert section of the track in either the Inspector Section or in the Mixer Window.
  2. Click on one of the empty boxes.
  3. Select one of the categories from the dropdown menu and click on one of the options in the submenu.

Monday, April 27, 2009

Intro to Logic Express- part 2 (Software Instruments)

Last week we started working with Logic Express and started to get familiar with the layout. Today we're going to get a little deeper into it and start making original beats using the Software Instruments.

The
Software Instruments in Logic are simply MIDI-based instruments that you can play with your keyboard and/or program from inside Logic. They are basically just like the instruments in Reason that you are already familiar with, but they are already inside this DAW program, which means you have full control over every aspect of the music (composing/editing/mixing) all in one place. How is this is different from the way we have been working with beats in Pro Tools?

To use a Software Instrument in your song, do the following:
  1. Start a new Logic session or Open an old one.
  2. Open the Track Menu and click on New.
  3. In the New Track Window that pops up, adjust the settings to create 1 Software Instrument.
  4. Click the Create button and you should see a new track appear in your Sequencer Window.
  5. Now look over to the left side of the screen and find the I/O symbol. Click on the box below the I/O and a list of all the Software Instruments pops up.
  6. Select the one you want to work with and specify whether you want it to be Mono, Stereo, or Multi Output.
  7. The Instrument should pop up for you to work with and your MIDI keyboard should now be controlling it. Try playing a few notes to make sure.


OK, so since we now know how to create Software Instruments, let's try working with one of them. Just like in Reason, a logical (haha) place to start is with the drums. One of the main drum plugins in Logic is called Ultrabeat. It works very similarly to the Redrum, so it should be really easy for you to get up and running with it. Please do the following:

  1. Create a new Software Instrument track and load up Ultrabeat using the steps laid out above.
  2. Try listening to the sounds in it by either playing some keys on your keyboard or by clicking on the notes of the keyboard on the left side of the window. If you like these sounds, skip ahead to Step 4. If you want to change them, go to Step 3.
  3. On the right side of the Logic screen, look under the Library tab and click on Drum Kits. Click on whatever one you want to work with.
  4. In the bottom right corner of the Ultrabeat window, click on the button called Full View. The window should change to show a big grid. This is the Sequencer where you can program your beat.
  5. Turn the Sequencer on by clicking the blue circle button right under where it says Sequencer. Hit the Play button right next to it to hear the pattern play.
  6. In that same area (lower left corner) find the pattern number (1 (C-1) sq) and click the little triangle next to it.
  7. Click on one of the patterns that does not have the letters sq next to it.
  8. Click on the sound you want to start working with and make sure it is highlighted.
  9. Click on any of the boxes where you want the drum sounds to hit and make that slap.
  10. When you are ready to really bring it into your song, click on the little box next to where it says Pattern and drag that into a track.
  11. Copy the beat out for as many bars as you want it to go.
  12. If you want to work on a fresh pattern, don't forget to change the pattern number.
Please create a verse (16 bars) and a chorus (8 bars) using the Ultrabeat drum machine. Get them all into the Main Sequencer. Let Chris or Corina check it out when you're done.

Wednesday, April 22, 2009

**Resume Workshop**


Today we're going to take a short break from the technical stuff to talk about a topic that is extremely important for our ability to become professionals: resumes. We've talked a little about resumes here in class, so we generally know what they are. Wikipedia says:

"A résumé is a document that contains a summary or listing of relevant job experience and education. The résumé or CV is typically the first item that a potential employer encounters regarding the job seeker and is typically used to screen applicants, often followed by an interview, when seeking employment."

So, we're going to be working with BAVC's
Internship Coordinator, Felice Archbold, who is going to help us put together really solid resumes that will help us highlight our skills. Please keep in mind that Felice is going to be in charge of finding YOUR internship, so the more you can help her by putting effort into your resume, the better she will be able to help you find a great internship opportunity!

Monday, April 20, 2009

Intro to Logic Express - part 1 (Loops)


Thank you to everyone who made it out and brought people to Family Night last week. I was really proud of all the work that everyone produced and I think that our families were very impressed. We will be talking about it more soon, but I want everyone to start thinking about our Final Event and what kind of project you might want to do. Just to give you a heads up, I will be expecting everyone to get up and present a piece of work.

Also, FYI, this Wednesday, April 22 we will be working on our resumes with Felice, our Internship Coordinator. This is an absolutely mandatory class! If you want to get an internship, you have to come to this class. I'm going to take it a step farther and say that in order to receive you stipend check, you need to be here. If you think you will be missing this class, let me know today and we can talk about what you need to do to make it up.

OK, but getting back to business...

Today we are going to start working with another DAW software called Logic Express.  What does DAW stand for? What is another example of a DAW.
Logic Express is a "limited functionality" version of Logic Pro, Apple's own DAW software platform. For the most part, they look and perform the same. The main differences are that Logic Ex. can't do surround sound, can't handle certain professional software/hardware applications, and doesn't have as many plugin instruments. Everything else is pretty similar.

Right now, let's just get familiar with the main sections of the screen:
- The Arrange Area
- the Editing Area
- the Toolbar
- the Inspector
- the Transport Bar
- the Media or Lists Area

Just like Pro Tools, in Logic you are basically just working with regions on tracks. And, as in PT, there are a number of ways that you are able to edit these regions. Here are some basic navigation/editing techniques:

- Drag a region to move it.
- Option-drag a region to copy it.
- Place the mouse pointer at the end of the lower right corner of a region to resize it.
- Place the mouse pointer at the end of the upper right corner of a region to loop it.

Today we're going to use these techniques to put together a basic song using some
Apple loops. Apple loops are free musical loops that come with Apple computers. They are used a lot in Garageband. 
Let's go ahead and start putting together a basic song and get familiar with working in Logic Express.

1. Launch Logic Express.
2. In the Collection Section on the left, click on the Compose Tab and Create an Empty Project.
3. In the Track Window that pops up, Create Software Instrument Track.
4. Click on the Loops tab in the Media window.
5. Browse through and find at least 8-10 loops that you can create a song with and drag them into your Arrange window to work with them.
6. Create a song that has an Intro, 2 Verses and 2 Choruses.
7. Save this as your name_Logic beat1


Wednesday, April 15, 2009

**Family Night**


Welcome to the Digital Pathways Advanced Audio Family Night! We are really happy that you came through to listen to some of our projects and check out what we do here. We're going to have a short presentation featuring some of our projects. Please feel free to move around and check out each student's workstation to see the diverse range of styles and talents that we have in our class.

And help yourself to snacks!

If you have any questions about the class or other BAVC programs, don't hesitate to contact either myself (crunde@bavc.org), or Naomi Kawamura, our Assistant Director of Next Gen programs (naomi@bavc.org).

Thanks for coming out!

Monday, April 13, 2009

Clean it up!

Welcome back, my friends!

Hope you all had an exciting and/or relaxing Spring Break. As we had discussed last time, we will be having our
Family Night on Wednesday, April 15 from 6:30-7:30 pm. How many of you think you will be having folks come through? We will have some snacks and light refreshments, FYI.

Also, we will
NOT be having a class this Saturday, April 18. Unfortunately, there was a schedule conflict with another BAVC class that day and there doesn't seem to be any dates that we can reschedule to right away, so for now you all get the time off...

In the meantime, here are the two things I want you all to be focusing on today:

  1. Please finish up all your Audio Post Production stuff. You can check to make sure you have everything in by going to Media Share>Student Work. Check all the folders that are highlighted orange and make sure you see your file in there.
  2. Put any work that you would like for me to share with our guests into the Student Work folder. It can be either music or an audio post piece (I may pick a few select pieces to play). Put a copy in the folder called Family Night. I would like every person to contribute at least one piece that they want to share!
  3. Work on some music! We're about to finish up with this audio post stuff and switch back to music (using some different tools), so let's start shifting our brains back into musical mode.

Wednesday, April 1, 2009

Finish Film scores and get ready for the fam!

Alright folks, so a couple things...

FIRST and foremost, we will be having our class'
Family Night on Wednesday, April 15, from 6:30-7:30 pm. This will be a chance for your family (and friends) to come and check out all the amazing work you've been doing since we started this class. This is going to be a pretty chill event where I'm going to talk a little bit about the class and what we've been learning, and I'm going to play some examples of work for our visitors. Folks will then be free to walk around to your computers and check your stuff. Please tell your loved ones and homies to come out and support!

SECOND, next week is Spring Break. NO CLASS that week. I want you to rest up, enjoy your week off and come back the following week ready to work your booty off for the last month and a half of the program.

So what does that mean for today?

Well, everyone has a bunch of stuff to do. Keep in mind that you only have two classes - today and Monday, April 13 to finish all your work and get it ready to show to your folks on Family Night. Today, I want you to focus on the following tasks:
  1. Finish and turn in at least 1 of the two film score assignments from the last two classes, along with the worksheet. If you already turned in the first one (Juan), then please move on to the second one today. If you're still finishing the first one, finish up and move on to #2.
  2. Finish and turn in all the rest of your Audio Post Production assignments. These should include Audio Post FX 1 (Buster Keaton), Animation FX (the janitor), Trailer ADR (the dialog), Scary Score (Haunting in Connecticut), and your 1-2 Film Scores.
  3. CLEAN UP YOUR COMPUTERS!!!
In terms of cleaning up your computers, please do the following:
  • In your folder with your name on it, create three folders and label them AUDIO POST PRODUCTION, MUSIC, and Work in Progress.
  • [Optional] Give AUDIO POST PRODUCTION and MUSIC their own nice outline colors so that they're easy to see (right-click on the folder name and pick a color).
  • Put all your finished Quicktime movies into AUDIO POST PRODUCTION.
  • Put all your best music into MUSIC (audio files and/or Reason files).
  • Put EVERYTHING ELSE into Work in Progress. This includes Pro Tools sessions, random Reason beats, etc.
  • You should only have 3 folders in your main folder now:

Wednesday, March 25, 2009

Audio Post: Film Scoring - part 2


Alright, I'm back folks! I hope you had a productive day last week when I was gone and that you were able to catch up on missing work. Now that we're all together again, we're going to get back into working on film scores.

Today, I want you to pick two more short clips that you're going to work with (in separate Pro Tools sessions). You can find the clips in Media Share>Class Materials>Movie Trailers>Film Score.

Please do the following:
  1. Check out all three clips and pick two that you want to work with. Copy them to your hard drive.
  2. Go into the same folder and get the file called Film Scoring_writeup. odt (Media Share>Class Materials>Movie Trailers>Film Score>Film Scoring_writeup.odt). Copy it to your hard drive and open it.
  3. Fill out the worksheet for the first film.
  4. Save the document as your name_fs writeup.
  5. Start a new Pro Tools session and Import the first movie clip into it.
  6. Create an original score using Rewire and/or other soft synths. (minimum 3 instruments)
  7. When you are done, save the PT session as your name_film score 1.
  8. Bounce the clip with your original score as a Quicktime movie called your name_film score 1.
  9. Put a copy in the Student Work folder on the Media Share.
  10. Repeat the above steps for your second film clip. Be sure to label both the PT Session and the Quicktime movie for this one as your name_film score 2.
  11. Turn in the fs writeup document to the Student Work folder.

Wednesday, March 18, 2009

Make It Up

Alright folks, so I'm out of town, but that doesn't mean you don't have anything to do while I'm gone! Like I said on Wednesday, I would like for you to use today to make up missing assignments, especially the audio post stuff we've been doing for the last few weeks.

Here are the assignments I am missing from each person:

  • Luis - Animation FX, Trailer ADR
  • Taurean - Audio Post FX1, Trailer ADR, Scary Score
  • Juan - Audio Post FX1, Trailer ADR, Scary Score
  • Robert - Animation FX, Trailer ADR, Scary Score
  • Gio - Audio Post Exercise, Audio Post FX1, Animation FX, Trailer ADR,
  • Alexi - Audio Post Exercise, Audio Post FX1, Animation FX (no dialog!), Scary Score (no sound)
  • Monjaro - Animation FX (movie is cut short), Trailer ADR
  • Tony - none
  • Rowvin - Audio Post FX1, Animation FX, Trailer ADR, Scary Score
  • Victor - Audio Post FX1, Trailer ADR
  • Chris - Audio Post FX1, Scary Score
  • Marisol - Trailer ADR,
  • Monica - Audio Post Exercise, Trailer ADR, Scary Score

Monday, March 16, 2009

Audio Post: Film scoring - part 1 (Rewire)


OK, so by now we have done some work with FX and dialog. Today, I want to spend some time working on the main musical aspect of film: the score.

According to Wikipedia:
"A film score is a broad term referring to the music in a film...The term soundtrack is often confused with film score, though a soundtrack may also include songs featured in the film as well as previously released music by other artists, while the score does not. A score is written specifically to accompany a film, by the original film's composer(s)."


So what are some of the differences between film scores and other kinds of music (like hip-hop songs?)
What kinds of instruments do you typically hear in a score? What kinds of things do you NOT hear?

The main purpose of the film score is to support the overall feel of the film and convey the emotions of the different scenes to the audience. It is very important for film scorers/composers to keep in mind that the main focus has to be the characters on the screen and the dialog. Usually, the music is NOT supposed to be the main element that the audience is focusing on, so the music should be done in a way that doesn't compete for the audience's attention - meaning you don't want the audience nodding to your beat when the characters on the screen are having a serious conversation!

So, you folks have actually already done some film scoring of your own in the last assignment. Did you have any challenges as you were doing it? Did the music line up with the images from the video?

Today we're going to focus a little more on scoring, but this time, you're going to write your music directly to the video. In order to do this, we need to get Reason working together with Pro Tools. This is possible through a thing called Rewire. Rewire allows you to control Reason through Pro Tools.

To Rewire Reason into Pro Tools, do the following:
  1. Create a new Pro Tools Session.
  2. Go to Track>New.
  3. Change the settings to 1, Stereo, Aux and hit the Create button.
  4. Now go to the Mix Window.
  5. At the bottom of your new Instrument track, find the little triangle and click on it. Make sure there is a checkmark next to the word "Instrument" in the menu that pops up. You should see this section appear at the top of the track:
  6. In the Inserts section, click on one of the double arrows and go to multi-channel plugin>Instrument>Reason. Reason should start up.
  7. In Reason, create an instrument that you can play with the keyboard (Subtractor/Malstrom/NN19/NNXT/etc.)
  8. Now go back to your Mix Window in Pro Tools.
  9. In the section at the top of the track, find where it says "none" and click on it. This is where you tell Pro Tools which Reason instrument you want to control with your keyboard.
  10. From the menu that drops down, click on the name of the instrument you just created in Reason. You should now be able to play the instrument from Pro Tools and record it, just like you would in Reason.
  11. From here you can create as many instruments in Reason as you want and create Instrument tracks for each one in Pro Tools. Don't forget to label them!!!
So, your assignment today is to Rewire Reason into Pro Tools and use it to score a short video clip. Please do the following:

  1. Create a new Pro Tools session and name it your name_scary score.
  2. Find the file on the Media Share folder called hauntinginconnecticut-edit01. (Media Share>Class Materials>Movie Trailers>haunginconnecticut-edit01). Copy it to your hard drive and Import it into your Pro Tools session.
  3. Watch it and start to think of what sounds you might want to use.
  4. Create and Instrument track and use Rewire to load Reason into it using the instructions above.
  5. Create an original score for this piece that uses at least 3 instruments and has a buildup section and a loud hit to scare the viewer. Make it scary!!!
  6. When you finish, Bounce it as a Quicktime movie and turn it into the Student Work folder.

Monday, March 9, 2009

Audio Post: ADR

Did you know that most of the dialog that you hear in a movie was not recorded at the time when the scene was actually being shot? A lot of the actors' lines were rerecorded in a studio in order to get better sound quality, or sometimes a better performance. This process is called Automatic Dialog Replacement, or ADR. The trick is for the actor to be able to recreate the emotion from the scene and make it sound as natural as possible. Here is a clip showing the ADR process on the film "King Kong".


Real ADR is done through a process called looping, where a short scene is played over and over and the actor performs his/her lines repeatedly until he/she gets them just right. It is the mixing engineer's responsibility to make the recording sound as believable as possible in the scene. This is done by making decisions in the recording process (microphone placement) and in the mix afterwards (using reverb and other FX to make it sound like the character is in the actual setting on screen).

We are going to get into more professional looping later, but for today, I just want you to practice doing your own basic ADR. Please do the following:

  1. Go into the Media Share and check out all the different movie clips that I have picked out for you. (Media Share>Class Materials>Movie trailers). Pay special attention to the dialog and the music being used.
  2. Pick one you want to work with and copy it to your folder on your computer.
  3. Start a new Pro Tools session and call it your name_trailerADR.
  4. Import your movie clip.
Now do one of the following:
  • Get a microphone and begin recording all the lines in the film. You should not be personally doing all the ADR! Get your classmates to play different characters and record them. We will be trading the mics every 45 minutes, so try to work quickly!
  • In Reason, make 2 different beats that are each 30 sec.-1 min. in length. You are going to use these as the music bed for your clip, so make sure they match the emotion of the scene. Export your beats as audio files and import them into your Pro Tools session.
  • Find and place FX for the most important actions on screen (explosions, etc.)

Wednesday, March 4, 2009

Audio Post: Animation Project (part 2)


Today, I want you to focus on finishing up your Animation FX project. If you have finished gathering all your sounds and spotting them in your session, please spend some time working on the following:
  • Mixing - adjust the volume and PANNING of each track so that everything sounds the way it looks on the screen.
  • Automation - use automation to give movement to your sounds so that they match the actions on the screen. At the very least, please automate the sounds of the cars moving left to right.
  • Add some FX - you don't need to go crazy with this (unless you get all inspired). But I would like for you to at least set up a reverb plugin on an Aux track and send some of your tracks to it to give a more realistic feel to certain sounds (for example, everything happening in the theater).
So I'm not going to do a long lecture. But I did want to give you a few practical tips to help you with this project...

Tracks
How many audio tracks do you have available to you in Pro Tools LE? How about STEREO audio tracks?

This is actually sort of a trick question, because they just changed the number of tracks in Pro Tools LE 8. However, since we are only working with Pro Tools LE 7.4, we only have 32 total audio tracks. And since each stereo track is actually 2 audio tracks, you can only have up to 16 stereo tracks.

So, what do you do if you run out of tracks? Well, you have a couple of options:
  1. Put similar sounds onto 1 track. For example, all car sounds, all sword sounds, etc. could be grouped onto a single track, so that you don't have 1 little sound here or there taking up a whole track to itself. As long as you don't need for multiple sounds to be playing at once, you should be cool. Be careful when you are mixing, though, to pay attention to the different volume levels of the different regions on your track. You might have to adjust the gain of some regions to make them sit right in the mix.
  2. Split your Stereo Tracks into Mono and get rid of one of them. This is where it gets tricky, but I'll do my best to show you how to make this happen:
Splitting Stereo Tracks
Let's say I have the following stereo track in my session and I want to split it into mono so that I can cut the number of tracks from 2 to 1.
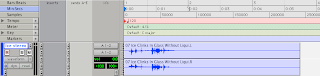
  1. Right-click on the track name and select Split Into Mono from the list.
  2. You should see two new tracks appear. They are the Left (L) side and Right (R) side of the original stereo track.
  3. Now right click again on the stereo track's name and select Hide and Make Inactive from the list. It should disappear.
  4. Now highlight one of the mono tracks by clicking on the track name. Select Delete from the list.
  5. Voila, you're down to one track and have one more free to use for other stuff!

Monday, March 2, 2009

Audio Post: Animation Project (part 1)

This week we're going to continue to work on our audio post skills by doing all the sound for a short animated clip. Cartoons are another special category of film/video from an audio perspective because there is no original sound to work with, or try to imitate. You can make up the whole sound of the world from scratch! There are no real rules and you are basically trying to make things sound even bigger and crazier than they do in real life.

Here is a clip of the Disney film, "Steamboat Willie" the first animated short to have a completely post-produced soundtrack (music, dialog and fx)! Pay attention to the kinds of sounds that are being used and try to see if you can think of what sorts of objects were actually being used to make the sounds you're hearing:


For today's assignment, you're going to be working with a modern piece of animation. One thing that you need to do in addition to working with all the FX is to create an FX List, which is literally a list of the actions in the film that are going to require FX and the times at which they happen in the movie.

For your assignment, please do the following:
  1. Create a new Pro Tools session
  2. Import the video called dpaa_animation fx to your session. (Media Share>Audio Post Materials>dpaa_animation fx)
  3. Now Copy the file called Audio Post_FX List from the Media Share to your computer and open it.
  4. In Pro Tools, hit the SPACEBAR to playback the movie. Watch the whole thing through once.
  5. Now watch it again and as you go through it, drop Memory Locators at all the major actions.
  6. After you've got all your locators, click through them one by one and write down the time info and a description of the sound in your FX List.
  7. Now go to File>Import and find all the FX you need and import them to either the region list or individual tracks.
  8. Consider using a microphone to add your own original sounds (grunts, human noises, etc.) Remember that the goal is to make this as realistic as possible.
  9. Do some mixing and automating. Especially concentrate this time on the panning of things (cars moving from side to side, etc.)
  10. Save this as your name_animation FX and have an instructor check it.
  11. Export the whole thing as a Quicktime movie and turn it into the folder called Animation FX in Student Work.
  12. Also turn in your FX list document. Be sure to put your name in the file name: your name_Audio Post_FX list.

Wednesday, February 25, 2009

Audio Post: Sound FX


Today you're going to work on placing sound fx to a short video clip. The goal is to make the clip sound as realistic as possible.

Before you start, you need to do a couple of things. Please copy the following items from the Media Share folder (Media Share>Class Materials) to your folder on your hard drive:
  • The folder called Hollywood Edge FX Library.
  • The video file called Buster Keaton_Bill1.
Once you've got those copied, you can jump into the first part of today's lesson...

Part 1 - Main FX
  1. Launch Pro Tools and create a new session. Name it: your name_audio post FX1
  2. Import the video clip Buster Keaton_Bill1 into your session (File>Import>Video)
  3. Hit the SPACEBAR to play back the clip and watch it through once. Increase the size of the video window to whatever works best for you. (The resolution is crappy. Nothing I can do about it. Sue me!)
  4. After you have watched it once, stop playback and zoom in on the video region until it fills up the Edit Window.
  5. Now you are going to watch it again, but this time you are going to drop Memory Locators at all the main action points. Remember, to drop a Memory Locator, you just hit ENTER on your keyboard. Please drop Memory Locators at all the following points and name them accordingly, along with the Start Times of when the actions happen:
  • Where he gets out of bed.
  • Where the 1st building falls
  • Where the 2nd building falls
  • When he jumps back into bed.
OK, so now you need to go find some sounds to actually put into your project...
  1. Go to File>Import and find the Hollywood Edge folder that you copied to your hard drive earlier.
  2. Browse through the folders until you find sounds that you think might work in this clip. Use the Preview Sound function at the bottom of the Import Window to quickly find sounds.
  3. When you find ones you want to use, hit the Convert button and then hit Done.
  4. Import these files to New Tracks.
  5. Now use the Grabber Tool to place them at the Memory Locators you dropped earlier.
  6. Watch the video closely and make sure that the FX are on point. You'll probably need to zoom in really closely in order to get them just right. (Apple =).
  7. If the FX play for too long, try using the Trim Tool to shorten them.
  8. Now we're going to Import some wind sounds to give the clip some ambience. Import this the same way you did with the other FX. Make sure the sound is placed at the beginning of the clip.
  9. Try creating a short Fade In at the beginning of the wind ambience to make it come in gradually.
Part 2 - Footsteps
  1. Go into the Media Share folder and find the folder called footsteps (Media Share>Class Materials>footsteps). Copy this into your Hollywood Edge folder on your hard drive.
  2. In Pro Tools, preview these footstep sounds and Import one of the files into your project on a new track.
  3. Move the region so that it is in the general area where the character starts walking/running.
  4. Now split up the individual steps into separate regions by using the Apple E command.
  5. Using the Grabber Tool, move the regions so that they line up with the actual steps. If you need to, copy the regions so that you have enough steps for the whole clip.
Now we're going to get into some basic automation to make it sound like he's running away and coming back.
  1. In your Edit Window, find your Footsteps Track.
  2. Underneath the Track Name, find where it says Waveform and click the little arrow next to it.
  3. Select Volume from the list that drops down.
  4. In the video, find the point where he starts to run away and, using the Grabber Tool, click on the black line that runs through the track. You should see a dot appear.
  5. Now find the point where he is farthest away from the camera. Make another dot on the line.
  6. Now find the point where he comes back to where the bed is. Make a third dot.
  7. Now go back to the 2nd dot (where he's farthest away) and drag it to the bottom of the track.
  8. Play the video back from the beginning and see if the footsteps sound convincingly like someone moving away and coming back.
Save this project and show one of the instructors.

Monday, February 23, 2009

{Audio Post exercise - pt 3}

By now you should have finished the editing for this project. Now you're going to spend some time mixing it. Today you are going to do the following things:

  • Remove the hum noise from a track using an EQ
  • Add reverb to the VO track using an Aux Input
  • Enhance the "whoosh" sound using an AudioSuite Plugin
  • General mixing (volume and panning)
  • Turn on the automation
  • Bounce a Quicktime movie out of Pro Tools

Remove the Hum
On the DX2 track, there is a region called DAT.02.new.10.sine. This region has a low frequency hum that you are going to get rid of using an EQ...

  1. In the Region List on the right side of your screen, find the region called DAT.02.new.sine. Click on it so that it is highlighted in your project.
  2. Press E on your keyboard to zoom in on it.
  3. Now go to Window>Mix to bring up the Mix Window.
  4. Find the DX2 track.
  5. In the Insert section of the track, insert a 1-band EQ III plugin (Plugin>EQ>1-band EQIII).
  6. Solo the DX2 track by clicking the S button.
  7. Press SPACEBAR to listen to the region.
  8. In the 1-Band EQ III plugin window, drag the gray ball in the graphic display down and to the left until you hear the hum reduced (around 60Hz).
  9. Close the plugin window and unsolo the track.
  10. Press Apple = to go back to the Edit Window and press E on your keyboard to zoom out.
  11. Listen to how it sounds in the full mix.

Add Reverb
  1. Go into back into the Mix Window (Apple =) and find the track called VO.
  2. In the Aux Send section, find the box called Bus 3-4 and click on it. The Send Window will appear.
  3. In the Send Window, click on the S button to solo the VO track.
  4. Press Apple = to go back to the Edit Window.
  5. Using the Grabber tool, click on any region on the VO track.
  6. Hit SPACEBAR to play the region.
  7. While listening to the track, raise the level on the Send fader to bring up the reverb.
  8. When you get a good level of reverb - not too much, not too little - hit SPACEBAR to stop playback.
  9. Press the Solo (S) button to unsolo the track.
  10. Close the Send Window.
Enhance the Whoosh
So, there's this "whoosh" sound in the project that sounds kind of boring. We're going to use two different types of plugins to make it more exciting.

(Flanger)
  1. In the Region List (on the right side of the screen), find the region called Whoosh.comp.2.1. Click on it so that it is highlighted in your project.
  2. Press E on your keyboard to zoom in on the region.
  3. Now, at the top of the screen, go to Audiosuite>Modulation>Flanger.
  4. Click on the Librarian Menu (aka presets) and choose "Slow N Deep".
  5. Preview what this effect is going to sound like by clicking the Preview button. Try adjusting the different sliders to change it up.
  6. When you've got it sounding good, go ahead and hit the Process button to process the audio region.
  7. Close the Flanger plugin window.
(EQ)
  1. Hit SPACEBAR to listen to the Whoosh playback.
  2. Go to your Mix Window (hit Apple =) and find the Whoosh track.
  3. In the Insert section, insert a 7-band EQ 3 (mono) plugin (Plugin>EQ>7-band EQ3 (mono)).
  4. Experiment with raising and lowering the colored balls in the graphic display of the EQ III plugin window.
  5. When you are satisfied with the results, close the plugin window and press SPACEBAR to stop playback.
  6. Press E on your keyboard to zoom back out.

Mix the Project
In this section, you pretty much have freedom to mix the different tracks the way you think sounds good using the volume faders and pan sliders. Start by doing the following:
  1. Go to the Mix Window.
  2. Holding down the OPTION button on your keyboard, click the volume fader of a track. All the tracks should reset to unity gain (0 dB).
  3. Now play the whole session back from the beginning and solo each track one at a time to listen to what each one is doing. As you listen, adjust the volume of the track to give it the right volume.
  4. Also adjust the panning, going by where something is on the screen - if you see an action happening towards the left side of the screen, move the pan slider to the left so that it sounds like the sound is coming from that direction.
  5. When you've gone through all the tracks, unsolo everything and watch the video from the start. Double check your mixing and make sure it still sounds the way you want it to. Adjust whatever needs adjusting.
  6. At this point, do a SAVE of your project (File>Save).
Turn on the Automation
  1. Go into the Mix Window.
  2. Holding down OPTION on your keyboard, click on the Automation Mode Selector for and track. Change the setting to Read. All of the tracks should go into Auto Read mode.
  3. Play the movie back from the beginning one more time to see what the automation is doing to your tracks.
Bounce the Movie
Last step...
  1. Go to the Edit Window.
  2. Using the Grabber tool, click on the movie region to select it.
  3. Choose File>Bounce To>QuickTime movie. The Bounce window should appear.
  4. Select a place to Save the movie in the Save In section of the window and change the filename to your name_Audio Post project.
  5. Click Save.
  6. Quit out of Pro Tools.
  7. Find your new Quicktime movie on your hard drive and double click on it to open it in Quicktime.
  8. Play it back and make sure all your audio post work is part of the movie.

Wednesday, February 18, 2009

{Audio Post exercise - pt 2}

Now you're going to get deeper into editing your audio post project. You need to do all of the following things:

  • Add and edit sound FX of horses and a knife being thrown.
  • Edit a popping sound on a track.
  • Change the music.
Before you do any of that, however, let's turn on the Keyboard Focus, which lets you use different Key commands. Click on this thing that looks like an a...z up in your Edit Window. It should be highlighted by a blue line:


Add Sound Effects
(Horses)
  1. In the Regions List, find the Horses Gallop Cavalry sound effect.
  2. Drag Horses Gallop Cavalry to any open space on the DX3 track.
  3. Click the Spot button in the upper-left corner of the Edit window to activate Spot Mode.
  4. With the Grabber Tool, click on the region that you just placed on the DX3 track. The Spot dialog box will open.
  5. Set the Time Scale to Min:Secs.
  6. In the Start field, type 0:34.750 and click OK. The region will move to the start time you typed.
  7. Click the Slip button to go back into Slip Mode.
  8. Use the Grabber tool, click on the Galloping Horses Cavalry region to select it.
  9. Press E on your keyboard to activate Zoom Toggle. The selected region will expand to fill the available space in the Edit window.
  10. With the Scrubber tool, click and drag near the start of the region. Slowly move the mouse back in forth while viewing the Movie window. Find the point where the scene changes to the close-up of the woman on the horse. Release the mouse to position the insertion point at this spot.
  11. Press D on your keyboard to create a fade-in.
  12. With the Scrubber tool, click and drag near the end of the region. Slowly move the mouse back and forth while viewing the Movie window. Find the point where the scene changes to the profile of the woman starting to throw the knife. Release the mouse to position the insertion point at this spot.
  13. Press G on your keyboard to create a fade-out.
  14. Press E on your keyboard to activate Zoom Toggle again, returning the session to the previous view.
(Knife Throw)
For this sound effect, you will need to sync the impact point of the sound effect to the point in the movie at which the knife hits the wall. To do this, you will use a Sync Point.

  1. Drag the Knife Throw region from the Regions List onto any open space of the Knife Throw track.
  2. With the region selected, press E on your keyboard to activate Zoom Toggle and zoom in on the region.
  3. With the Scrubber tool, click and drag across the region until you hear the sound of the knife making impact. Release the mouse to position the insertion point as close as possible to the beginning of the impact (about halfway into the region).
  4. Choose Region>Identify Sync Point. A small triangle will appear in the lower part of the region, under the insertion cursor, signifying a Sync Point at that spot.
  5. Press E on your keyboard to activate Zoom Toggle again, returning the session to the previous view.
Now let's create a memory location:
  1. With the Scrubber tool selected, click and drag on the movie track to locate the point when the knife hits the wall; position the insertion point at this spot. The impact should occur somewhere between 0:38.500 and 0:39.500.
  2. Press ENTER on the numeric keypad to create a New Memory Location.
  3. Type "Knife Hits Wall" in the Name field and type the time from the Main Counter (Edit window) in the Comments field.
  4. Click OK.
Finally, we can spot the Knife Throw sound effect to the movie:
  1. Click the Spot button in the Edit window to activate Spot mode.
  2. With the Grabber tool, click on the Knife Throw region on the Knife Throw track. The Spot dialog box will appear.
  3. In the Sync Point field, type the time that you noted in the Knife Throw marker.
  4. Click OK and the sound should be spotted to where the knife hits the wall.
  5. Click the Slip button to return to Slip mode.
  6. Play the movie back to see if the effect is in the right place.

Remove the Pop
The VO track for the project has a pop in the third region that needs to be removed. You will do this by using the Pencil tool to redraw the waveform.

Remove the pop for the VO track:
  1. Solo the VO track by clicking on the Solo button under the track name.
  2. Click on the third region on the VO track with the Grabber tool to select the region.
  3. Press the SPACEBAR to play the region. Listen for the pop between the words "heroes" and "are born".
  4. With the region selected, press E on your keyboard to activate Zoom Toggle. The region will expand to fill the available space in the Edit window.
  5. With the Zoomer tool, click and drag over an area of the region to zoom in closer on the silence between the spoken words. The pop will become visible as a sudden spike in the waveform.
  6. Keep zooming in on the spike until it's big enough to be seen really clearly. You will need to be able to see the path of the waveform displayed as a single line.
  7. Using the Pencil tool, drag a horizontal line in the center of the track across the middle of the pop. The line doesn't have to be perfectly straight, but try to get it as close as possible.
  8. If necessary, click the region with the Grabber tool to reselect it.
  9. Press the SPACEBAR to play the region and verify that the pop no longer exists. If you need to, select Undo and repeat the process to obtain the desired results.
  10. When you're satisfied with the edit, press E on your keyboard to return the session to the previous view.
  11. Unsolo the VO track.

Change the Music
  1. First, preview the music by listening to the two different audio files in the Regions List.
  2. Find the regions called New Music 1 and New Music 2.
  3. Option-click on the New Music 1 region in the Regions List. The audio will play back as long as you hold down the mouse button.
  4. Repeat the last step to listen to New Music 2.
  5. Decide which music you like better. DON'T PUT IT INTO YOUR PROJECT YET!!!
  6. Find the track called Music Mix.
  7. Using the Grabber tool, click on the Music Mix_02 region on the track. It should be highlighted
  8. Now hold down the CONTROL key on your keyboard and drag your New Music region onto the track called New Music.
  9. Mute the Music Mix track.
  10. Play back the session and check out how the new music sounds.
You might have noticed that the music plays for too long now. We're going to edit it so that it is EXACTLY the same length as the original music.
  1. Using the Grabber tool, click on the Music Mix_02 region in the Music Mix track.
  2. Note the Timecode or Min:Sec time displayed in the Edit Selection Edit End field in the Counters display of the Edit Window.
  3. Click on the New Music region on the New Music track.
  4. Press E on your keyboard to activate Zoom Toggle. The region will be centered on the screen and will expand or shrink to fit the available space.
  5. Press the Spot button to place Pro Tools in Spot mode.
  6. Using the Trim tool, click on the right side of the New Music region. The Tool should look like a "]" when you click. The Spot dialog box will open.
  7. In the End field, type the time that you noted in step 2. the region end wil be trimmed to the length of the original music track.
  8. Click the Slip button to place Pro Tools into Slip mode.
  9. Press E on your keyboard to return the session to the previous view.