Wednesday, December 10, 2008

Recording with Pro Tools (part 2)


Probably the single most important part of an audio engineer's job is in getting good levels BEFORE he/she starts recording.

Why is this so important?

For one thing, if the performer does a really good take, but you didn't bother to set things up right, then
you are responsible for the quality not being as good as it could have been.

For another thing, once you have recorded, you are pretty much stuck with the performance. Sure, you can add all kinds of processing and do crazy stuff with it, but none of that can make it sound as good as if you really took the time to set things up right.

So what can you do to get the quality as good as possible? Couple things:
  1. Proper microphone placement.
  2. Setting a proper level at the preamp.
For setting a good recording level, the rule of thumb is this:

Try to get the level as loud as possible without ever clipping (hitting the red).

What is clipping?

Clipping is when something is distorting digitally. It happens when the volume of your track is louder than the computer can handle. Usually it is really obvious and it sounds like things are crackling in a really ugly way. Sometimes, though, it's hard to hear while it's happening, especially when you're listening on cheap headphones or monitors. But then when you listen back to your music on a better system, you suddenly realize that it's there. At that point you're stuck with it. This is why Pro Tools has a little red light at the top of each track meter to tell you when you are clipping.

Always take the time to set levels and make sure you're not clipping before you start recording!!!
Wednesday, December 3, 2008

Recording with Pro Tools (part 1)


So, hopefully today we will start to actually do some recording with Pro Tools. From here on out, every time you do any recording, I want you to think of yourself as an engineer. As an engineer, you are responsible for the quality of the recording. In this class, you are going to follow some basic steps to make sure you get good quality.

Here is my basic recipe for setting up a recording session.
  1. First, transfer your Pro Tools session to the instructor station and make sure it opens correctly. Note: All PT sessions should be saved to the folder called Student PT Sessions
  2. Create a new track (mono, audio) to record your performer on and label it something like "Vox 1".
  3. Create a second new track and label it TB.
  4. Attach the microphone to the mic stand properly.
  5. Adjust the mic stand so that the mic is the appropriate height, angle and distance from the performer. Always make sure that the front of the mic is facing the performer!!!
  6. Plug all XLR (microphone) cables and headphones into the appropriate spots on the Digi 003 (or mBox).
  7. Attach a talkback microphone so that you can communicate with the performer.
  8. Turn on phantom power (if appropriate).
  9. Record enable your tracks by clicking on the little red R button.
  10. Adjust the levels of the two mics with the microphone input (aka preamp) knobs on the Digi 003 so that you are getting a strong signal but not clipping.
  11. Adjust the performer's headphone level so that he/she can hear both him/herself and the beat.
  12. Adjust the level of your own headphones.
  13. Check with your performer to make sure he/she is ready and start recording!

Monday, December 1, 2008

Intro to Pro Tools - part 4

Pro Tools organizes all of the information and files that go into a session in a very specific way. It is important for you to know a little bit about it because you're going to be moving your recording sessions between computers and you may run into a situation where a certain file is missing and you will have to go and find it. Where do you look?

First, let's ask ourselves what happens when we create a Pro Tools session...

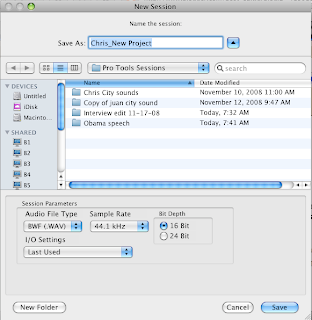
When first start a new session, this window pops up:

What you are doing in this window is deciding a couple of things:
  1. The name of the session
  2. What quality (Sample Rate, Bit Depth) you want your session to be (higher resolution = more memory required)
  3. What file format (AIF, WAV, MP3, etc.) you want the audio to be
  4. Where on your hard drive you want to store the session
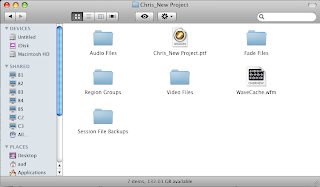
Then, once you hit "Save", Pro Tools creates a new folder containing some specific things. Take a look...
Here is the folder for my new session.If I go inside this folder, this is what I will see.

So what is all this stuff?
  • Pro Tools session file - this is the actual "file" that you open to work with Pro Tools. However, it doesn't actually have any audio in it. It's just a window that lets you work with files that are actually located somewhere else - sort of like one of those remote controlled robots that astronauts use.
  • Audio files folder - this is where all your recordings and imported audio is actually saved. This is folder is actually more important than the Pro Tools session file
  • Session file backups - Pro Tools periodically does an automatic save for you, just in case your computer crashes, or some catastrophe hits. You can load these files to recover your work.
  • Wavecache - This is basically a file that contains the regions in your session.
  • The other folders (Region Groups, Video Files, Fade Files) you don't need to worry about at this point. They all store information related so specific processes in Pro Tools that we will get to later. Just be aware that they are there!
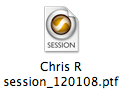
The most important thing that you need to understand is this: a Pro Tools session file, which looks like this: is nothing by itself.

Key Point
When you are trying to move or back up a copy of your Pro Tools session, you must copy the entire folder that contains all the other folders inside it, especially the Audio Files folder!!!


Recording Projects - prep work

Today I want you to do a few things in preparation for working on your recording projects.
  1. Go into the Media Share>Class Materials>Project Worksheets and find the file called "Project Worksheet.odt". Copy it to your folder and open it. Please fill out this form so that Corina and I know what you are working on and can help you plan your project. IMPORTANT: be sure to save this file as "(your name)_Project Worksheet.odt", then copy it back to the Project Worksheets folder
  2. If you have a Reason beat that you are going to be recording vocals over, you need to get the beat into Pro Tools. To do this, you will have to Export audio files of all the individual instruments out of Reason and Import them into a Pro Tools session. (See below for instructions on how to do this.)
  3. If you need to finish writing lyrics, then please take time to do that today.
  4. If you still need to finish a beat, then do that.
So, everyone should have stuff to work on. If you need suggestions, ask Chris or Corina...

Click on the links for info on how to do the following:
Exporting Audio out of Reason
Importing Audio into Pro Tools

Monday, November 24, 2008

Recording Projects

Today we have a couple of things I want to get done:
  1. We're going to build the vocal booth together!
  2. I want everyone to finish and turn in the edits from the interviews with former slaves.
  3. I want everyone to think about and prepare a recording project for next week.
Let's start with the recording project...

So, next week we will be getting into the process of recording audio in a studio-like setting. Everyone will get a chance to run the recording session AND be recorded on the mic.

In the meantime, we need to be thinking about WHAT we're going to record. Now some of you folks already have beats ready to record raps over. If that's the case, are you planning to sing or rap over them yourself? Do you have lyrics ready? Were you planning to collaborate with someone? If you were going to collaborate, with who? Does that person know about the project? Does he/she have lyrics ready?

Today is your time to prepare your lyrics and/or music for recording next week.

What are you going to do if you don't sing or rap? Here are a couple of ideas:
  • Record an instrument (e.g. guitar) that you play.
  • Record an original poem or spoken word piece.
  • Record an essay (or college personal statement) that you are proud of.
  • If you really can't think of anything of your own to record, find a favorite poem, speech or a part of a book that you can read and possibly put to a beat.

Monday, November 17, 2008

Intro to Pro Tools - part 3


Today we're going to be learning more about how to work with audio in Pro Tools:
  • Importing audio files
  • Copying regions
  • Using the Trim tool
Let's start with the first part, Importing. Importing is another way to get audio into your Pro Tools session. To do it, just do the following:
  1. Go to File>Import>Audio
  2. In the Window that pops up, find the file you want to import and click Convert. Then click Done.
  3. PT will ask you to select a Destination Folder where the new audio file will be stored. 9/10 times, it will automatically select the Audio Files folder for you. This is where you want to put this audio file.
  4. Lastly, Pro Tools will ask you where you want to put this new file in the actual session. You can either put it in the Region Bin, or you can create a brand new track for it. For now, just select New Track and click OK.
So importing is pretty straight forward, right? Sorta?

Now let me talk briefly about how to copy an audio region from one track to another.

There are a couple of ways to do this, the first is to simply highlight a piece of audio with the Cursor tool, Copy it (Cmd-C) and then paste it on the new track (Cmd-P).

Another good one to know is to hold down the Option key and click and drag with the Grabber tool. The only catch to this is that you will copy the whole region, not just the highlighted section, so you may have to split the region first...

Last thing I'm going to mention is the Trim Tool.
The Trim Tool is used for trimming the edges or your regions. It's an easy way to edit little sections of audio and get rid of extra stuff you don't need. The great thing about the Trim tool is that even if you get rid of a piece of audio, you can always get it back by dragging the edge of the region back out.

Interview website: link

Wednesday, November 12, 2008

Intro to Pro Tools - part 2


So we've figured out how to get audio into Pro Tools (importing, recording) and we've learned a little bit about how PT's folder structure works. But once you've got the audio in there, how do you start working with it? In other words, what are the "tools" of Pro Tools?

There are 6 basic Edit Tools that let you interact with your media in different ways. They are:

1. Zoomer Tool - Let's you zoom in and out around a particular area within a track.
2. Trim Tool - Lets you adjust the left and right sides of an audio region and quickly get rid of the parts you don't need.
3. Selector Tool - Lets you position the playback cursor or select an area for playback/editing.
4. Grabber Tool - Lets you grab a whole region and move it around.
5. Scrubber Tool - Lets you "scrub", or listen closely to a piece of audio by clicking and dragging the cursor over it. Sounds really cool (like a turntable), but unfortunately you can't record it.
6. Pencil Tool - Lets you get in and redraw the waveform data. You mostly use this to repair little pops and clicks in your file. Important: using the pencil tool is a destructive process!

Now in addition to the 6 basic tools, PT also lets you use what's known as the Smart Tool. The Smart Tool gives you the functions of the Trim, Selector and Grabber tools all at once. You move between these tools by moving the cursor over different parts of the region. In addition to the tools I just listed, the Smart Tool also makes it easy for you to do Fades, which we will cover later.

What I do want to cover right now are two basic processes:
1) Creating new tracks
2) Splitting Regions


Monday, November 10, 2008

Intro to Pro Tools - part 1


Congratulations! You are ready to officially start moving into the universe of Pro Tools.

So what does Pro Tools do? Basically, it gives you all the main functions of a recording studio on your computer:
  • It lets you record
  • It lets you edit
  • It lets you mix
Beyond that, though, it also serves as the center of your music production setup. Meaning that it can connect to and control all of your software and hardware instruments using MIDI.

A software program that can do all of these things (audio and MIDI) is called a Digital Audio Workstation (DAW).

Pro Tools is definitely not the only DAW on the market. Other popular DAWs include Logic, Cubase, Nuendo, Sonar, and others. Pro Tools isn't even necessarily the "best" DAW. Lots of people feel that other programs (e.g. Logic) are actually a lot better for certain things, like recording MIDI.

So why then does everyone seem to be using Pro Tools these days? Probably a number of reasons, including ruthless marketing tactics by Digidesign. Personally, I think that Pro Tools is laid out in a very simple, straight-forward format. It's easy to look at and get around in.

There are actually two main components to any Pro Tools setup: the software and the hardware interface.

The software is where the actual recording/editing/mixing happens.

The interface is just a piece of equipment that lets you get audio into and out of the software. In our classroom we have two different types of interface: the Mbox2 Minis on the student stations, and the Digi 003 on the instructor station. Even though they look really different, they are still performing the same basic function - audio in/audio out.

Important: Pro Tools will not work if it doesn't have a Digidesign interface connected to the computer!

So today, we're going to do a couple of things with Pro Tools:
1) We're going to record the audio from our sound collecting experiment on Saturday into Pro Tools.
2) We're going to record our own voices into Pro Tools and create audio files that we can use in our beats.

To record from the MiniDisc player into ProTools:
  1. Connect the MiniDisc player to Input 1 on your Mbox using the cable provided by the instructor.
  2. Launch Pro Tools and create a new Pro Tools session: Go to File>New Session.
  3. Name it like this: City Sounds_11-8-08
  4. Make a new track by going to Track>New.
  5. Pro Tools will now have you specify what kind of track you want to make. You want to create 1 Mono Audio track. If you see anything different than this, ask the instructor to take a look. If it looks all good, click Create.
  6. On the left side of the track, hit the Record Enable button. It should flash red.
  7. Start the Minidisc player and listen to the level going into PT. If it is too low, turn up the Input 1 knob on the front of the Mbox, if it is too high, turn it down. Whatever you do, MAKE SURE THAT YOU DON'T HIT THE RED BOX ON THE TRACK'S VOLUME METER.
  8. When you get a good level, turn the Minidisc player back to the beginning of the first track.
  9. Click on the Record button at the top of the Window and then hit the Play button right next to it.
  10. Hit Play on the Minidisc player and you should be recording!
  11. Let Pro Tools record everything that we recorded on Saturday. When it gets to the end, hit Stop.
  12. Save this session by going to File>Save.
  13. Save it into your folder and call the session file "(your name)_City Sounds.pts"
  14. Give all the equipment to another student and let the instructor know that you are done with this part of the assignment.
Here is today's other assigment:

1. Record 2-3 vocal samples into Pro Tools (the instructor will help you with this).
2. Load your samples into the Media Share folder and copy files into your folder on your computer
3. Open Reason and create a new song.
4. Create a NN19 Sampler
5. In the screen of the NN19 right click and select 'Split Key Zone'.
6. Click on the Key Zone on the left side and click the browse sample button
7. Load one of you two samples
8. Now click on the Key Zone on the right side of your NN19 screen and click the Browse Sample button.
9. Play some of the keys on your keyboard and notice where the pitch changes are happening.
10. Now lets change the key where the sample on the right plays its original pitch.
11. Find the knob called Root Key (under the NN19 screen).
12. Turn the knob until the root key is C4.
13. Your two samples should now play in their original pitches on Keys C3 and C4.
14. Make a beat that incorporates your samples.

Wednesday, November 5, 2008

History


We have just witnessed history happening. In honor of this notable moment, we are going to spend today using our artistic and musical talents to reflect how we as individuals feel about what has occurred.

Your assignment is to make a beat to go along with President-elect Obama's acceptance speech. Please note that I am not telling you how to feel about this event, I am challenging you to express your own thoughts and feelings through your music. My hope is that we will hear a wide range of musical interpretations of this historic event.

Please do the following:
  1. Find the file called "Obama speech.rns" on the Media Share folder and copy it to your computer. (Media Share>Class Materials>Obama speech.rns)
  2. Open it.
  3. Make a beat to go under it that reflects how you are feeling right now. Include all the things that we have learned in this class so far, including different instruments and FX.
  4. Save the file as "(your name)_Obama speech.rns" and put a copy on the Media Share folder.


Working with FX (part 2) - Inserts vs. Auxes

So, yesterday we started working with putting some FX on our tracks. We were doing this by directly connecting FX processors to our instruments. Using FX this way is called "Inserting"; you are literally inserting the FX processor in between the instrument and the mixer, like this:

Subtractor -> Scream -> Mixer

There is another way to work with FX, though, that is a little more complicated to explain, but actually a really useful tool for when you're working on your music.

In this method, you connect the FX processor to your Mixer. You can then apply these FX to any instrument coming through the Mixer by turning up the knobs called
Auxes.
Aux knobs let you send a certain amount of your signal to the FX processor and then blend the affected (wet) sound with your original (dry) sound. Reason will let you connect up to four different FX processors to the Auxes.

As usual, this sounds way more complicated than it actually is. To use the Auxes, just do the following:
  1. Click on the Mixer in the rack to make sure it is highlighted.
  2. Go to the Create menu and pick an FX processor (reverb, distortion, delay, etc.). Reason will automatically connect it to the Mixer for you.
  3. Pay attention to which Aux the processor is connected to. You can tell by looking in the upper right corner of the Mixer where it says "Return".
  4. Find the track of the instrument you want to put the effect on and turn up the appropriate Aux knob.

Monday, November 3, 2008

Working with FX (part 1) - basics

So now that we are getting to be experts at putting our songs together we can spend some time concentrating on getting everything to sound just the way we want it to. One of the easiest ways to do this is to add FX Processors to our instruments.

FX Processors are things that you attach to your instruments (Redrums, Subtractors, NN19s, etc.) that change the way they sound. Depending on what kind of music you are trying to make, FX can help your music to sound more exciting (slap!), smoother, or just more unique.

There are lots of different types of FX available to you in Reason. For now, let's just focus on two of them:
  1. Reverb - Reverb makes things sound like they are in a big, echoey space like a hallway or a church. It can help instruments or vocals sound more "real", as if they were coming from a real musician playing in a hallway somewhere. To get an idea of what I'm talking about, let's listen to an example of an acapella vocal track that has a lot of reverb on it: link. The reverb processor in Reason is the RV7000. It looks like this:
  2. Distortion - Distortion is that gritty, harsh sound that makes things sound more aggressive. It is most commonly heard on guitars in rock music, but it can be put on anything to give it a harder feel. In hip hop, distortion is sometimes used on synthesizers or drums to make them sound more raw and less clean. The distortion processor in Reason is called the Scream. It looks like this:
One important thing to keep in mind is that there is usually a knob or a setting that lets you control how much of an effect to put on an instrument. This knob is usually called "Dry/Wet". On the Scream it is called "Damage Control".

Assignment:
Today you're going to use the two types of FX we discussed above in a beat. This beat should include three instruments: a Redrum and two other instruments of your choice (only 1 Dr. Rex please).
  1. Start a new Reason file.
  2. Create a Redrum and spend 10 minutes making a basic beat.
  3. Now create a Subtractor/NN19/etc. and load up a sound you like. Make a short melody (~4 bars) to go with your drums.
  4. Now make sure that your Subtractor/NN19 is highlighted in the rack, then go to the Create menu and select the RV7000.
  5. Listen to your beat. How does the instrument sound now? If there is too much reverb, turn the Dry/Wet knob towards Dry until you have just the right amount of echo.
  6. Make create another Subtractor/NN19/etc. and add another few sounds.
  7. Make sure that your Subtractor/NN19 is highlighted in the rack, then go to the Create menu and select the Scream.
  8. For the last step, try putting a Scream, an RV7000 or both on your Redrum.
  9. Save the beat to your folder as "(your name)_FX 1.rns"

Monday, October 27, 2008

NNXT - Exploring the sounds of the Orchestra

So today I want to talk a little bit about the different families of instruments that you can find in an orchestra and get familiar with the types of sounds that are available to you through Reason instruments, such as the NN19, NNXT and Combinator. Keep in mind that just because orchestral instruments are traditionally used to play classical music, that doesn't mean that they can't be incorporated into hip hop and other forms of music. Here is an example of a famous beat that combines orchestral sounds along with more modern sounds like synthesizers, drum machines, etc.:

Whats The Difference (Instrumental) - Dr. Dre, Xzibit, Eminem

An orchestra is just a group of instruments, usually grouped together to play classical music. The size of an orchestra can range from under 50 musicians to over 100. Take a look at how the orchestra is laid out in the diagram above. Why do you think the different categories of instruments are placed where they are?

You should be aware of this general rule:

The larger an instrument is, the lower the pitch of the sound it can make. The smaller the instrument, the higher the pitch.

For our purposes, I just want you to know the four main families of instruments found in an orchestra because it will help you to know where to look for certain types of sounds when you are making your own music.

The four families of orchestral instruments are:
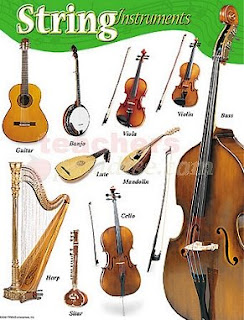
  1. Strings - These are all the instruments that have strings. They are usually played with a bow, though sometimes they can also be plucked. Instruments in the string family typically include double basses, cellos, violas and violins. You could also throw guitars and harps into this category.
  2. Brass - These are metal instruments that you blow into. They tend to be extremely LOUD with a sharp tone that can cut through all the other instruments! Common instruments in the brass family include tubas, trombones, french horns and trumpets.
  3. Woodwinds (aka "Reeds") - These are also instruments that are blown into, though unlike brass, they make sounds by having a thin wooden reed in the mouthpiece that vibrates when you blow on it. Most woodwind instruments (but not all) are made out of wood and have a mellower sound than brass instruments. Common woodwinds are oboes, clarinets, bassoons and flutes. Interestingly, saxophones also are considered woodwinds. Why is this interesting?
  4. Percussion - These are instruments that you bang on, either with your hands or special sticks! Typically, they are used to make really loud statements at certain parts of the music. They include all kinds of drums and cymbals and gongs, but they can also include melodic instruments like xylophones and glockenspiels, which are played with sticks called mallets.


Now let's hear what a whole orchestra playing together can sound like...


Assignment:


Real simple. You're going to make a beat that uses instruments from each of the orchestral families of instruments using the NNXT Sample Player.
  1. Open Reason and start a new file (File>New)
  2. Create a Redrum and take no more than 15 minutes to make a beat (32 Steps please!)
  3. Create 4 NNXT samplers
  4. Load sounds from each of the 4 orchestral families and make a beat that is at least 24 bars long. You can only use sounds from the following folders: Brass, Mallets, Orchestral, Reeds and Pipes, Strings)
  5. Save it to your folder as "(your name)_orchestral.rns" and put a copy in the Media Share folder (Media Share>Student Work>Orchestral Beat)
Having trouble knowing where to start? Keep in mind that just because you're using orchestral instruments, it doesn't mean that you have to write a symphony! You're still just making beats here. Here are a few tips on where to start.
  • Start by browsing through different sounds until you find one that sounds cool and get inspired by that. Make a main melody using that sound and just add little touches with the other instruments
  • Try changing the octave on your keyboard to change the pitches of the sounds. Certain instruments (like flutes and violins) sound better in higher octaves, while others (like tubas and cellos) sound better lower.
  • Strings tend to be good for making long, rich sounds. Try holding the keys down for a while.
  • Brass tends to be better for short, sharp sounds. Try playing quick little hits on the keys.
  • Reeds can go either way. Try playing either short or long notes and see what sounds better.

Wednesday, October 22, 2008

Recreate a beat (part 2)

For the last part of this lesson, we're going to record ourselves playing the synth melody for "Dumb It Down".

1. First, create a Subtractor.
2. Now load the following sound:  
Reason Factory Sound Bank>Subtractor Patches>MonoSynths>Rave Lead.zyp.
3. Now let's find the notes used in this melody. They are 
CA flatB flat, and F.
4. Set your Loop Markers around the first 4 bars of the beat (L on Bar 1, R on Bar 5).
5. Listen to the beat on You Tube for a bit to get a feel for when then notes are played. Notice that the last note is held for a long time. The whole melody is a total of 4 bars long.
6. Now switch back to Reason make sure that the Loop On/Off button is lit up in the Transport Window. Hit play and practice playing the melody over the beat.
7. When you are ready to try to record it, hit Record
. Don't feel pressured to start playing right away. You can let it play through the loop once and then start playing when it comes back around.
8. When you're done, press the Record button again, or Stop if you want to stop.
9. How's your performance? Tight? If so, then go ahead and Copy and Paste this Loop for the whole 16 bars.
10. 
Save it as (your name)_Dumb It Down.rns
11. Put a copy on the Media Share folder in Student Work>Dumb It Down

If your performance was not tight, however, Reason can help you through the miracle of Quantizing...

1. Make sure that your new Region is highlighted
2. Go over to the 
Tool Window and click on the Tool tab.
3. In the section where it says 
Quantize, hit the Apply button. What happens?
4. So you may need to fine tune some of the notes even more.
5. To do this, double click on the Region and scroll up or down until you find your notes.
6. Listen to it play back and try to spot where the problem notes are.
7. Click and drag the note in the appropriate direction until it sounds like it's in the right place (make sure that you're only moving one note, and not all of them!)
8. Drag the right edges of some of the notes to be long enough.

Save it and you're done.

Recreate a beat (part 1)

Last time we got into the wonderful world of bass lines and worked to recreate our own version of the bass line for "Blow the Whistle".

Today, we're going to take our listening skills even further and remake both the drums and the melody from a song by Lupe Fiasco.

We're going to listen to listen to the actual song, but first let's review some important concepts.
  • What is a bar?
  • How do you know how to count the number of bars in a song?
  • What drum sound can you listen for to help you count?
OK, so now let's check out Lupe's Song and listen critically to what's happening in the beat. Specifically, I want you to count out how often the drums are switching up and what is changing when they switch.

Alright, so now that we're familiar with it, let's recreate those drums...

Step 1:
1. Launch Reason and create a new session (File>New)
2. Right off the bat, let's give this a file name
"(your name)_Dumb It Down.rns" and save it into our folders:
(File>Save As>My Documents>ADP Audio1 Chris Runde>Reason Stuff>
Dumb It Down_your name)
3. Now let's set the tempo to 95 BPM.
4. Create a Redrum Drum Machine.
5. Now let's load some drum sounds into the machine. I want you to load individual drum sounds, not kits! In case you forgot, individual drum sounds can be found under:
Reason Factory Soundbank>Redrum Drum Kits>xclusive drums-sorted

Here are each of the four files I want you to load into the first four slots of your Redrum:

Slot 1 - BassDrums>Bd3_Riot.aif
Slot 2 - Bass Drums>Bd_Xtc7.wav
Slot 3 - SnareDrums>Sd2_HardKnox.wav
Slot 4 - HiHats>Hh_Xfile2.wav

6. Now that we've got our sounds loaded, we can begin to build our first drum loop. Let's start with the snare...
  • Press the Select button at the bottom of Slot 3 (Sd2_HardKnox) and put the snare on squares 5 and 13.
  • Next, hit Select on Slot 1 (Bd3_Riot) and put the bass on squares 1, 3, 4, 8, 10, and 12. Starting to sound like an actual beat, right? Now, for the final touch let's add some hi hat...
  • Hit Select on Slot 4 (Hh_Xfile2) and in the sequencer, click on squares 1, 3, 4, 5, 7, 8, 10, 11, 15, and 16. Sounds fairly close to the real song, right? Sorta? Kinda?
7. OK, now we need to get the loop down into the sequencer window using Copy Pattern to Track

Now we're ready to make the second part of the beat, which is basically exactly the same as the first part of the beat, except that one drum switches up. So instead of recreating the whole thing from scratch, we're going to just copy our first pattern and change the bass drum

1. Click on Pattern 1 in the Redrum.
2. Go to Edit>
Copy Pattern
3. Now click on
Pattern 2 in the Redrum
4. Go to Edit>
Paste Pattern
5. Click the Run button to listen to the pattern. 
6. Now click the Select button at the bottom of
Slot 1 and make a note of all the notes that are lit up (1, 3, 4, 8, 10, 12). Click on each of these and turn them off.
7. Now click Select on
Slot 2.
8. Click on all the same notes that were previously lit up in Slot 1.
9. Hit Run to listen to the new beat.

Now let's get the new pattern down into the sequencer.

1. Set the loop points to mark off one bar: 
L on bar 3R on bar 5.
2. Click on the Redrum track on the left of the Sequencer window.
3. Click on
Pattern 2.
4. Go to Edit>
Copy Pattern to Track.
5. Click on Enable Pattern Section to make sure you don't play back two copies of the beat.
6. Hit play and make sure it's playing back right.

So now you should have a full 4-bar loop. Move your Loop markers to loop the whole thing:

Put the L on Bar 1, and the R on Bar 5.

Hit play and listen to the sweetness of the beat.

SAVE.

In the next lesson, we will be moving on to the melody...


Monday, October 20, 2008

Bass Lines


A bass line is the low sounding part of a song that works with the drums to create a rhythmic pulse.
Before people started using electronic instruments (like Reason) to make music, the bass line was usually played on a bass guitar:
So to get a clearer idea, let's listen to the following song, "What's Going On" by Marvin Gaye for a minute. Try to focus on the low-pitched part of the song.


Now let's listen to what just the bass line alone sounds like from that same song...

It used to be that the bass line was just a supporting part of the song, not the main thing that people were listening to. But then in the 70's when music styles like soul, funk and reggae started becoming popular, the bass started to play a bigger role. Then by the time hip hop became really big in the 1980's, artists started putting a LOT of bass in their songs so that sometimes it was the main part of the music that people were listening to.

So, to get a better understanding of what bass lines do and how we can use them in our own music, we are going to remake the bass line from Too Short's single "Blow the Whistle" then recreate the drum beat. Default-tiny Too Short- Blow The Whistle (instrumental) uploaded by 2104-tiny beanycastillo
  1. Create a new Reason file.
  2. Set Tempo at 100 bpm
  3. Create a Subtractor
  4. On The Subtractor, click on the folder in the upper left hand corner.
  5. Go to Reason Factory Sound Bank>Subtractor Patches> Bass>Dodger Bass.zyp
  6. Now let's add the Bass line from Blow the Whistle, which is in Eb Minor!
  7. Move your Right Marker to Bar 3.
  8. I'll show you how to play the bass line. You will be playing the following keys: C, Eb and Gb.
  9. After you feel like you have the part under your fingers, record it and quantize it.

  10. Create a Redrum.
  11. Listen to the Instrumental of Blow the Whistle.

  12. What sounds do they use?
  13. What boxes do you think they go on?
  14. Recreate the drum beat from Blow the Whistle.
  15. Copy Pattern To Track.
  16. Save as "(Your Name)_Blow the Whistle.rns".

Wednesday, October 15, 2008

Keyboarding Basics: the Minor Scale

Alright, so it's been a week or so since we worked on our keyboard knowledge, but I want to get back to it for a minute so that you can expand the range of sounds you have to use when you are making your own music.

I would like to introduce you to my friend, the Minor Scale.

First, lets quickly refresh our memory of the Major Scale. Here is the formula, in case you forgot:
W-W-H-W-W-W-H

Now, here is the formula for the Minor Scale:

W-H-W-W-H-W-W


Do you notice anything about how these two formulas are related?

Now let's see how this formula looks on an actual keyboard. Here are the notes of the C Minor Scale...


Assignment #1:
  1. Open a new Reason file.
  2. Create a Subtractor Analog Synthesizer.
  3. Load a sound from one of the four main categories (Bass, Monosynth, Pad, or Polysynth).
  4. Set the L marker on Bar 1 and the R marker on Bar 5.
  5. Turn on the Click (aka metronome) and set the tempo to something you like.
  6. Practice playing the C Minor scale up and down in time with the metronome: (C-D-Eb-F-G-Ab-Bb-C-C-Bb-Ab-G-F-Eb-D-C)
  7. When you've got it down, hit the Record button and record your performance.
  8. Fix any off notes by quantizing.
  9. Save the file to your folder as "(your name)_C Minor scale.rns"
  10. Put a copy of the file on the Media Share folder in: Media Share>Student Work>Minor Scale
Now, I want you to try applying the Minor Scale to making your own original beat.

Assignment#2
1. Pick a key you want to start with.
2. Figure out the notes of the Minor Scale starting from that key. Remember the formula: W-H-W-W-H-W-W
3. Now spend some time making an original drum beat so that you have something to play over.
4. When you've got a beat, set your L marker on Bar 1 and your R Marker on Bar 5.
5. Create either an NN19 or a Subtractor and load a sound that you want to work with.
6. Listen to your beat playing and start experimenting with playing some notes from the Minor Scale that you picked. Keep it simple; just 3-4 notes are fine.
7. Practice playing your melody. When you've got it down, hit the Record button and record yourself playing.
8. If you need to fix any notes, use the quantize function.
9. Create another NN19 or Subtractor and load a sound that you think will go well with the sound you've already got.
10. Add a few more notes over what you've already recorded. These notes should also be from the Minor Scale that you picked earlier. Again, keep it simple - just a few notes is fine.
11. When you've got some sounds for both of your instruments, start copying and pasting your melodies to make a longer song.
12. When you've got something that you feel is solid, save it as "(your name)_Minor beat" and let the instructor check it out.


Monday, October 6, 2008

History of Hip Hop Production (Breakbeats)


Last week we got into working with the Redrum and became familiar with a very important piece of equipment in modern music production: the drum machine.

Today we're going to take a minute to talk about another piece of equipment, the sampler, and a concept that changed the way music is made: breakbeats.

First, we are going to check out a Powerpoint presentation I made to help explain the history of hip hop production. If you want to refer back to this at any point, you can find the file at:
Media Share>Class Materials>Hip Hop Production_powerpoint.ppt.

As we learned just learned, breakbeats were the parts of old school funk and soul records where all the instruments would drop out except for the drums. This where people would really freak out and go off dancing.

Kool Herc figured out that by having two copies of a record, he could extend the breakbeat for as long as he wanted, playing one record, then the other, then rewinding the break on the first record, etc. Some people would say that this was the real start of hip hop as a new, distinct style of music, using the breakbeat as the backbone of the whole genre.

A few years later, when samplers became affordable and had long enough sampling times, people were able to just record the breaks into the samplers and have them loop automatically for however long they wanted.

Today we're going to get into working with a particularly famous break from a song called "The Funky Drummer", by James Brown.

Let's listen to the original for a second...

Funky Drummer

So now we're going to work on getting the break into our own songs so that we can use it.

But first...

Disclaimer: Sampling other peoples' work without their permission is a violation of copyright laws. If you are merely sampling for your own educational purposes (like we are doing in this class), then you should be fine. BUT if you intend to create and SELL music that incorporates samples of other artists' work, you are legally required to get all necessary permissions from the owners for the use of those samples. Think about it...how would you feel about someone taking your music without your permission and then making money off it?

That said, check it out...

1. First, let's grab the sample you're going to be working with and copy it to your hard drive. Go to Media Share>Class Materials>Samples and find the file called "Funky Drummer_break.wav". Copy that into your folder on your hard drive.
2. Now create a new Reason song called "(your name)_Breakbeat lesson 1.rns".
3. Create an NN19 sampler in your rack and make sure it is connected to the Mixer.
14:2. 4. Click on the Browse Sample button at the top of the NN19.
5. Load the Funky Drummer_break file into the sampler.
7. So what we've got here is a 1-bar drum break. In order to make it line up with everything else in your song, we've got to make the tempo of the song fit with the tempo of the break, so...first, set your L and R markers so that they are marking off a single bar (put the L on Bar 1 and R on Bar 2).
8. Now hit Shift-Tab on your keyboard to go into the Edit View of your NN19 sequencer track (the part that shows the keyboard and notes).
9. Click on the Pencil Tool.

10. Find key C3 and draw a note that is exactly one bar long.
11. Make sure the Loop On/Off button is lit up, then hit play and listen to the loop. What is happening?
12. Now let's adjust the tempo so that the sample loops perfectly...Lower the tempo until you get down to 101 BPMs. Sounds good, right?
13. OK, so now we've got something that we can work with.
14. Switch over to the Arrange View (hit Shift-Tab).
15. Now we're going to mark this sample loop into a group. Using the Pencil Tool, mark off 1-bar. You should now have a region that you can copy and paste as many times as you want in the song.

From here, you can go ahead and create a Redrum drum machine and start making a beat that can either go over the loop, or switch off parts with it. You might also want to try playing with the Filters on the NN19 and seeing how you can switch up the sound of the loop.

Your assignment:
Create a song that is at least 24-Bars long that incorporates both the drum break and the your own original Redrum drum pattern (32-steps).

Advanced folks -
If you want to challenge yourself, have the break play back at a pitch other than its original pitch - meaning a key other than C3. You will have to adjust the tempo to make this work out right. When you're trying to match the tempo, if you hear the loop getting cut off too soon, then the tempo is too fast. If you hear a gap at the end of the loop before it starts playing again, then the tempo is too slow.