Wednesday, February 25, 2009

Audio Post: Sound FX


Today you're going to work on placing sound fx to a short video clip. The goal is to make the clip sound as realistic as possible.

Before you start, you need to do a couple of things. Please copy the following items from the Media Share folder (Media Share>Class Materials) to your folder on your hard drive:
  • The folder called Hollywood Edge FX Library.
  • The video file called Buster Keaton_Bill1.
Once you've got those copied, you can jump into the first part of today's lesson...

Part 1 - Main FX
  1. Launch Pro Tools and create a new session. Name it: your name_audio post FX1
  2. Import the video clip Buster Keaton_Bill1 into your session (File>Import>Video)
  3. Hit the SPACEBAR to play back the clip and watch it through once. Increase the size of the video window to whatever works best for you. (The resolution is crappy. Nothing I can do about it. Sue me!)
  4. After you have watched it once, stop playback and zoom in on the video region until it fills up the Edit Window.
  5. Now you are going to watch it again, but this time you are going to drop Memory Locators at all the main action points. Remember, to drop a Memory Locator, you just hit ENTER on your keyboard. Please drop Memory Locators at all the following points and name them accordingly, along with the Start Times of when the actions happen:
  • Where he gets out of bed.
  • Where the 1st building falls
  • Where the 2nd building falls
  • When he jumps back into bed.
OK, so now you need to go find some sounds to actually put into your project...
  1. Go to File>Import and find the Hollywood Edge folder that you copied to your hard drive earlier.
  2. Browse through the folders until you find sounds that you think might work in this clip. Use the Preview Sound function at the bottom of the Import Window to quickly find sounds.
  3. When you find ones you want to use, hit the Convert button and then hit Done.
  4. Import these files to New Tracks.
  5. Now use the Grabber Tool to place them at the Memory Locators you dropped earlier.
  6. Watch the video closely and make sure that the FX are on point. You'll probably need to zoom in really closely in order to get them just right. (Apple =).
  7. If the FX play for too long, try using the Trim Tool to shorten them.
  8. Now we're going to Import some wind sounds to give the clip some ambience. Import this the same way you did with the other FX. Make sure the sound is placed at the beginning of the clip.
  9. Try creating a short Fade In at the beginning of the wind ambience to make it come in gradually.
Part 2 - Footsteps
  1. Go into the Media Share folder and find the folder called footsteps (Media Share>Class Materials>footsteps). Copy this into your Hollywood Edge folder on your hard drive.
  2. In Pro Tools, preview these footstep sounds and Import one of the files into your project on a new track.
  3. Move the region so that it is in the general area where the character starts walking/running.
  4. Now split up the individual steps into separate regions by using the Apple E command.
  5. Using the Grabber Tool, move the regions so that they line up with the actual steps. If you need to, copy the regions so that you have enough steps for the whole clip.
Now we're going to get into some basic automation to make it sound like he's running away and coming back.
  1. In your Edit Window, find your Footsteps Track.
  2. Underneath the Track Name, find where it says Waveform and click the little arrow next to it.
  3. Select Volume from the list that drops down.
  4. In the video, find the point where he starts to run away and, using the Grabber Tool, click on the black line that runs through the track. You should see a dot appear.
  5. Now find the point where he is farthest away from the camera. Make another dot on the line.
  6. Now find the point where he comes back to where the bed is. Make a third dot.
  7. Now go back to the 2nd dot (where he's farthest away) and drag it to the bottom of the track.
  8. Play the video back from the beginning and see if the footsteps sound convincingly like someone moving away and coming back.
Save this project and show one of the instructors.

Monday, February 23, 2009

{Audio Post exercise - pt 3}

By now you should have finished the editing for this project. Now you're going to spend some time mixing it. Today you are going to do the following things:

  • Remove the hum noise from a track using an EQ
  • Add reverb to the VO track using an Aux Input
  • Enhance the "whoosh" sound using an AudioSuite Plugin
  • General mixing (volume and panning)
  • Turn on the automation
  • Bounce a Quicktime movie out of Pro Tools

Remove the Hum
On the DX2 track, there is a region called DAT.02.new.10.sine. This region has a low frequency hum that you are going to get rid of using an EQ...

  1. In the Region List on the right side of your screen, find the region called DAT.02.new.sine. Click on it so that it is highlighted in your project.
  2. Press E on your keyboard to zoom in on it.
  3. Now go to Window>Mix to bring up the Mix Window.
  4. Find the DX2 track.
  5. In the Insert section of the track, insert a 1-band EQ III plugin (Plugin>EQ>1-band EQIII).
  6. Solo the DX2 track by clicking the S button.
  7. Press SPACEBAR to listen to the region.
  8. In the 1-Band EQ III plugin window, drag the gray ball in the graphic display down and to the left until you hear the hum reduced (around 60Hz).
  9. Close the plugin window and unsolo the track.
  10. Press Apple = to go back to the Edit Window and press E on your keyboard to zoom out.
  11. Listen to how it sounds in the full mix.

Add Reverb
  1. Go into back into the Mix Window (Apple =) and find the track called VO.
  2. In the Aux Send section, find the box called Bus 3-4 and click on it. The Send Window will appear.
  3. In the Send Window, click on the S button to solo the VO track.
  4. Press Apple = to go back to the Edit Window.
  5. Using the Grabber tool, click on any region on the VO track.
  6. Hit SPACEBAR to play the region.
  7. While listening to the track, raise the level on the Send fader to bring up the reverb.
  8. When you get a good level of reverb - not too much, not too little - hit SPACEBAR to stop playback.
  9. Press the Solo (S) button to unsolo the track.
  10. Close the Send Window.
Enhance the Whoosh
So, there's this "whoosh" sound in the project that sounds kind of boring. We're going to use two different types of plugins to make it more exciting.

(Flanger)
  1. In the Region List (on the right side of the screen), find the region called Whoosh.comp.2.1. Click on it so that it is highlighted in your project.
  2. Press E on your keyboard to zoom in on the region.
  3. Now, at the top of the screen, go to Audiosuite>Modulation>Flanger.
  4. Click on the Librarian Menu (aka presets) and choose "Slow N Deep".
  5. Preview what this effect is going to sound like by clicking the Preview button. Try adjusting the different sliders to change it up.
  6. When you've got it sounding good, go ahead and hit the Process button to process the audio region.
  7. Close the Flanger plugin window.
(EQ)
  1. Hit SPACEBAR to listen to the Whoosh playback.
  2. Go to your Mix Window (hit Apple =) and find the Whoosh track.
  3. In the Insert section, insert a 7-band EQ 3 (mono) plugin (Plugin>EQ>7-band EQ3 (mono)).
  4. Experiment with raising and lowering the colored balls in the graphic display of the EQ III plugin window.
  5. When you are satisfied with the results, close the plugin window and press SPACEBAR to stop playback.
  6. Press E on your keyboard to zoom back out.

Mix the Project
In this section, you pretty much have freedom to mix the different tracks the way you think sounds good using the volume faders and pan sliders. Start by doing the following:
  1. Go to the Mix Window.
  2. Holding down the OPTION button on your keyboard, click the volume fader of a track. All the tracks should reset to unity gain (0 dB).
  3. Now play the whole session back from the beginning and solo each track one at a time to listen to what each one is doing. As you listen, adjust the volume of the track to give it the right volume.
  4. Also adjust the panning, going by where something is on the screen - if you see an action happening towards the left side of the screen, move the pan slider to the left so that it sounds like the sound is coming from that direction.
  5. When you've gone through all the tracks, unsolo everything and watch the video from the start. Double check your mixing and make sure it still sounds the way you want it to. Adjust whatever needs adjusting.
  6. At this point, do a SAVE of your project (File>Save).
Turn on the Automation
  1. Go into the Mix Window.
  2. Holding down OPTION on your keyboard, click on the Automation Mode Selector for and track. Change the setting to Read. All of the tracks should go into Auto Read mode.
  3. Play the movie back from the beginning one more time to see what the automation is doing to your tracks.
Bounce the Movie
Last step...
  1. Go to the Edit Window.
  2. Using the Grabber tool, click on the movie region to select it.
  3. Choose File>Bounce To>QuickTime movie. The Bounce window should appear.
  4. Select a place to Save the movie in the Save In section of the window and change the filename to your name_Audio Post project.
  5. Click Save.
  6. Quit out of Pro Tools.
  7. Find your new Quicktime movie on your hard drive and double click on it to open it in Quicktime.
  8. Play it back and make sure all your audio post work is part of the movie.

Wednesday, February 18, 2009

{Audio Post exercise - pt 2}

Now you're going to get deeper into editing your audio post project. You need to do all of the following things:

  • Add and edit sound FX of horses and a knife being thrown.
  • Edit a popping sound on a track.
  • Change the music.
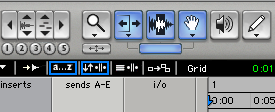
Before you do any of that, however, let's turn on the Keyboard Focus, which lets you use different Key commands. Click on this thing that looks like an a...z up in your Edit Window. It should be highlighted by a blue line:


Add Sound Effects
(Horses)
  1. In the Regions List, find the Horses Gallop Cavalry sound effect.
  2. Drag Horses Gallop Cavalry to any open space on the DX3 track.
  3. Click the Spot button in the upper-left corner of the Edit window to activate Spot Mode.
  4. With the Grabber Tool, click on the region that you just placed on the DX3 track. The Spot dialog box will open.
  5. Set the Time Scale to Min:Secs.
  6. In the Start field, type 0:34.750 and click OK. The region will move to the start time you typed.
  7. Click the Slip button to go back into Slip Mode.
  8. Use the Grabber tool, click on the Galloping Horses Cavalry region to select it.
  9. Press E on your keyboard to activate Zoom Toggle. The selected region will expand to fill the available space in the Edit window.
  10. With the Scrubber tool, click and drag near the start of the region. Slowly move the mouse back in forth while viewing the Movie window. Find the point where the scene changes to the close-up of the woman on the horse. Release the mouse to position the insertion point at this spot.
  11. Press D on your keyboard to create a fade-in.
  12. With the Scrubber tool, click and drag near the end of the region. Slowly move the mouse back and forth while viewing the Movie window. Find the point where the scene changes to the profile of the woman starting to throw the knife. Release the mouse to position the insertion point at this spot.
  13. Press G on your keyboard to create a fade-out.
  14. Press E on your keyboard to activate Zoom Toggle again, returning the session to the previous view.
(Knife Throw)
For this sound effect, you will need to sync the impact point of the sound effect to the point in the movie at which the knife hits the wall. To do this, you will use a Sync Point.

  1. Drag the Knife Throw region from the Regions List onto any open space of the Knife Throw track.
  2. With the region selected, press E on your keyboard to activate Zoom Toggle and zoom in on the region.
  3. With the Scrubber tool, click and drag across the region until you hear the sound of the knife making impact. Release the mouse to position the insertion point as close as possible to the beginning of the impact (about halfway into the region).
  4. Choose Region>Identify Sync Point. A small triangle will appear in the lower part of the region, under the insertion cursor, signifying a Sync Point at that spot.
  5. Press E on your keyboard to activate Zoom Toggle again, returning the session to the previous view.
Now let's create a memory location:
  1. With the Scrubber tool selected, click and drag on the movie track to locate the point when the knife hits the wall; position the insertion point at this spot. The impact should occur somewhere between 0:38.500 and 0:39.500.
  2. Press ENTER on the numeric keypad to create a New Memory Location.
  3. Type "Knife Hits Wall" in the Name field and type the time from the Main Counter (Edit window) in the Comments field.
  4. Click OK.
Finally, we can spot the Knife Throw sound effect to the movie:
  1. Click the Spot button in the Edit window to activate Spot mode.
  2. With the Grabber tool, click on the Knife Throw region on the Knife Throw track. The Spot dialog box will appear.
  3. In the Sync Point field, type the time that you noted in the Knife Throw marker.
  4. Click OK and the sound should be spotted to where the knife hits the wall.
  5. Click the Slip button to return to Slip mode.
  6. Play the movie back to see if the effect is in the right place.

Remove the Pop
The VO track for the project has a pop in the third region that needs to be removed. You will do this by using the Pencil tool to redraw the waveform.

Remove the pop for the VO track:
  1. Solo the VO track by clicking on the Solo button under the track name.
  2. Click on the third region on the VO track with the Grabber tool to select the region.
  3. Press the SPACEBAR to play the region. Listen for the pop between the words "heroes" and "are born".
  4. With the region selected, press E on your keyboard to activate Zoom Toggle. The region will expand to fill the available space in the Edit window.
  5. With the Zoomer tool, click and drag over an area of the region to zoom in closer on the silence between the spoken words. The pop will become visible as a sudden spike in the waveform.
  6. Keep zooming in on the spike until it's big enough to be seen really clearly. You will need to be able to see the path of the waveform displayed as a single line.
  7. Using the Pencil tool, drag a horizontal line in the center of the track across the middle of the pop. The line doesn't have to be perfectly straight, but try to get it as close as possible.
  8. If necessary, click the region with the Grabber tool to reselect it.
  9. Press the SPACEBAR to play the region and verify that the pop no longer exists. If you need to, select Undo and repeat the process to obtain the desired results.
  10. When you're satisfied with the edit, press E on your keyboard to return the session to the previous view.
  11. Unsolo the VO track.

Change the Music
  1. First, preview the music by listening to the two different audio files in the Regions List.
  2. Find the regions called New Music 1 and New Music 2.
  3. Option-click on the New Music 1 region in the Regions List. The audio will play back as long as you hold down the mouse button.
  4. Repeat the last step to listen to New Music 2.
  5. Decide which music you like better. DON'T PUT IT INTO YOUR PROJECT YET!!!
  6. Find the track called Music Mix.
  7. Using the Grabber tool, click on the Music Mix_02 region on the track. It should be highlighted
  8. Now hold down the CONTROL key on your keyboard and drag your New Music region onto the track called New Music.
  9. Mute the Music Mix track.
  10. Play back the session and check out how the new music sounds.
You might have noticed that the music plays for too long now. We're going to edit it so that it is EXACTLY the same length as the original music.
  1. Using the Grabber tool, click on the Music Mix_02 region in the Music Mix track.
  2. Note the Timecode or Min:Sec time displayed in the Edit Selection Edit End field in the Counters display of the Edit Window.
  3. Click on the New Music region on the New Music track.
  4. Press E on your keyboard to activate Zoom Toggle. The region will be centered on the screen and will expand or shrink to fit the available space.
  5. Press the Spot button to place Pro Tools in Spot mode.
  6. Using the Trim tool, click on the right side of the New Music region. The Tool should look like a "]" when you click. The Spot dialog box will open.
  7. In the End field, type the time that you noted in step 2. the region end wil be trimmed to the length of the original music track.
  8. Click the Slip button to place Pro Tools into Slip mode.
  9. Press E on your keyboard to return the session to the previous view.

{Audio Post exercise - pt 1}

So today we're going to start doing an audio post tutorial that is part of the official Pro Tools 101 class. Basically, you're going to be working with a video clip and working with all the sound in it.

Your main objectives for today are as follows:

  • Import the video clip into the Pro Tools session
  • Import some music tracks to go under the video.
  • Import some sound FX of swords.
  • Record a short VO clip.
OK, first things first - Find the folder called PT101_Post Project on the Media Share folder and drag it into your folder on your computer. Open the session.

Importing the Video
  1. Choose File>Import>Quicktime Movie.
  2. Navigate to the Video Files folder (found inside the PT101_Post Project folder that you just copied).
  3. Select Red Dragon.mov and click Open. The movie will be imported into your session and will open in a Movie window. A movie track will also display in the Edit window.
  4. If you feel like watching the movie, go to the beginning of the timeline and hit the SPACEBAR.
Import Music Audio Files to the Region List
  1. Choose File>Import>Audio to Region List.
  2. In the Import Audio dialog box, navigate to the folder called New Music (found inside the PT101_Post Project folder).
  3. Select the four New Music files (click on the first, then Shift-click on the last to select them all) and click the Add Files button. The files will be added to the Region Import area of the dialog box.
  4. Click Done. The regions New Music 1 (Stereo) and New Music 2 (Stereo) will display in your Regions List.
Import Files from the Workspace Browser
  1. Go to Window>Workspace to open the Workspace browser.
  2. Click on the Find icon (magnifying glass) to reveal the search fields.
  3. Type Sword Group in the Name field.
  4. Select Region Group File from the Kind pop-up menu. Make sure that there is a check next to the disk volume that contains the Post Project folder.
  5. Click Search. After a moment the Sword Group file will appear in the lower pane of the Workspace browser.
  6. Drag the Sword Group file onto the Swords track in the Edit window.
  7. If necessary, use the Grabber tool to drag the Sword Group to the very start of the session.
  8. Close the Workspace browser to get it out of your way.
Record a New Voiceover
  1. Get a mic and cable from the instructor.
  2. Get the track called New VO ready for recording (set the input, set your levels, record-enable the track, etc.)
  3. Find the memory location called New VO Start. This is the point where you will start recording.
  4. Record yourself saying the following sentence: "You traveled the world, now you must journey inwards." Be sure to include a dramatic pause between the words, "world" and "now".
Save the project.

Elements of Audio Post Production

Today, we're going to jump into working with audio post-production. What exactly is audio post, you ask? Well...
Audio post-production refers to all the work that is done on a movie's sound after the shooting has finished. The sounds that go into a video or film can be broken down into 4 basic categories:

1. Dialog - the MOST important part of the soundtrack. Includes anything being said by characters on or off screen. In many cases, the dialog you hear in a movie is actually NOT what was recorded at the time of filming; it is rerecorded in a studio by the actors who say their lines while watching the video of their performances. This is called ADR (Automatic Dialog Replacement). When the dialog is being spoken by someone who is not on the screen, it is called Voice Over, or VO.


2. Foley sounds - sounds made by the characters as they move around in the scene (footsteps, clothing rustling, picking things up, etc.). These sounds are performed by foley artists who specialize in making sounds that realistically match the actions on the screen (even though the sounds may actually be made using all kinds of crazy materials).

3. Sound effects - sounds not made by the characters. These can include realistic sounds (cars, animals, everyday things), ambience, bigger-than-life sounds (explosions), and imaginary sounds (lightsabers).

4. Music - there are four main types of music you might hear in a video
  • Score - Music composed specifically for a film or video
  • Jingle - Music composed for a commercial
  • Environmental music - music that is actually part of the background of a scene (from a radio, playing in a bar, etc.)
  • Soundtrack music - any music where the music is the main audio focus (a music video, the end credits of a movie)

Wednesday, February 4, 2009

PT: Using Aux Sends for FX

OK, so today we're going to learn about how you can use the Aux Sends in Pro Tools to put an effect on a bunch of tracks at once.

First of all, what the #*!& is an Aux Send?

An Aux Send is a part of a mixing board that lets you take the signal from one track and direct it somewhere else.

Why would you want to do that?

One big reason is to have a multiple tracks going to the same FX processor.

Why would you want to do that?
  • versatility - isn't it more useful to have an effect be accessible to every track rather than just one track? Also, you can get really creative by sending sounds to different places and doing different things in the mix.
  • simplicity - instead of putting an reverb on every track, you can just have one reverb and send whatever you want to it
  • less processing power - why make your computer do a bunch of extra work if you don't have to
  • gives your mix a more consistent sound.
So, where do you find the Aux section in Pro Tools? In the Mix Window, it is the light grey section under the Inserts.
When you click on one of the double arrows, you will be asked to choose either
interface or bus. What is the difference?

Interface refers to something outside of the computer - you are talking about running something into or out of Pro Tools.

Bus refers to directing a signal to somewhere else inside Pro Tools, like another track.

Actually, you can create a special type of track in Pro Tools that is meant for being used with the Aux Sends. It is called an
Aux Input and you can create it the same way you would create an audio track: Track>New Track

From there you just change the type of track from audio to
Aux Input.

So now, you are going to try creating some Aux Inputs to use for FX on your own music.

Please do the following assignment:
  1. Open the Pro Tools session of your most complete song. (If you don't have a song in Pro Tools, ask one of your classmates if you can use one of theirs for this assignment.)
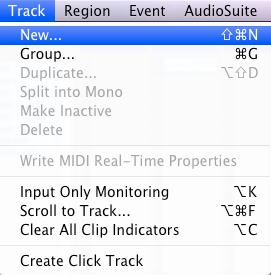
  2. Go to the Track menu>New Track and create 2 Stereo Aux Inputs.
  3. Change the name of Aux 1 to "Drum FX".
  4. Change the name of Aux 2 to "Vocal FX".
  5. On the Drum FX track, change the input to Bus 1-2.
  6. On the Vocal FX track, change the input to Bus 3-4.
  7. In the Insert section of the Drum FX track, create a DVerb reverb processor (multichannel plugin>Reverb>D-Verb (stereo))
  8. On ALL of your drum tracks (bass, snare, clap, hi hats, shakers, toms, tambourines, etc.), go to the Sends section and create a send going to Bus 1-2.
  9. Solo each of these drum tracks and the Drum FX track so that you can only hear the drums.
  10. Now one-by-one, click on each of the drum sends and raise the faders to where you can hear the track going through the reverb. Set it to where it sounds good - HINT: LESS IS USUALLY MORE! Some tracks might sound best with NO reverb on it.
  11. Try adjusting the settings of the D-Verb to get slightly different sounds (Church, Room, Plate, etc.)
  12. When you've got the drums sounding good, unsolo everything and listen to the whole beat. Does it sound good? If not, why? Is there something you could change to make it better?
  13. Now see if you can do the same process with all of your vocal tracks (use Bus 3-4 in the Sends section)
  14. Save this and have one of the instructors check it out.

Monday, February 2, 2009

{Amon Tobin - interesting electronic artist}

Below are two videos from and about Amon Tobin, a well-known electronic artist. One of the things he is known for is the way he records all kinds of sounds from the world and then uses them as samples in his music. Check it out and see what you think...


{Pro Tools Mixing Tutorials}


Today we're going to be working on a basic mixing tutorial that is available online through the website About.com. This exercise will give you the chance to practice using the two types of processors that we have been talking about in class: compressors and an equalizers (aka EQs).

Before you can get going with this exercise, though, you will need to copy the Pro Tools session folder to your hard drive. I have put this on the Media Share folder for you. Please drag the following folder to your hard drive:

Media Share>Class Materials>Mixing Lesson (PT 5-6.9)

When you've got the folder copied, please go to this website:

http://homerecording.about.com/od/mixingyourmusic/ss/mixinglesson.htm

This is the first page of a 6 part lesson. As you finish each part, just click on the Next button at the bottom of the page. These are very simple instructions that are just designed to give you a basic understanding of what is involved with mixing a song.

FYI, this is not what I would consider "good" music. But that's not really the point. Mixing engineers spend a very large amount of time working on music that they wouldn't normally choose to listen to. What is important is that you begin to develop skills that you can apply to any mixing situation, including but not limited to your own music.

Here are some things you should be aware of on a couple of the pages:

  • Page 1 - I've already given you the PT Session, so don't worry about downloading it.
  • Page 3 - There is no compressor preset called "Basic Snare". Use the one called "Snare Comp" instead.
  • Page 4 - When it says you should work with the "low end", use the section of the EQ called LF (the red one). When it says to work with the "High mids", use the section called HMF (the green one).
  • Page 5 - When it tells you to add a "tiny bit of mid range", which section do you think you should use?
  • Page 6 - You don't need to bounce the song out of PT (just show your work to Chris or Corina), but you DO need to try compressing at least one of the other tracks they suggest (acoustic guitar, keyboards, electric guitar).

When you finish, save this (you don't have to rename the session) and have one of the instructors check it out. Then, go on to the next Tutorial about mixing drums...

First, copy the following Pro Tools session file to your computer:
MediaShare>Class Materials>Mixing Drums Session

http://homerecording.about.com/od/protoolstutorials/ss/drums_pro_tools.htm