Wednesday, December 10, 2008

Recording with Pro Tools (part 2)


Probably the single most important part of an audio engineer's job is in getting good levels BEFORE he/she starts recording.

Why is this so important?

For one thing, if the performer does a really good take, but you didn't bother to set things up right, then
you are responsible for the quality not being as good as it could have been.

For another thing, once you have recorded, you are pretty much stuck with the performance. Sure, you can add all kinds of processing and do crazy stuff with it, but none of that can make it sound as good as if you really took the time to set things up right.

So what can you do to get the quality as good as possible? Couple things:
  1. Proper microphone placement.
  2. Setting a proper level at the preamp.
For setting a good recording level, the rule of thumb is this:

Try to get the level as loud as possible without ever clipping (hitting the red).

What is clipping?

Clipping is when something is distorting digitally. It happens when the volume of your track is louder than the computer can handle. Usually it is really obvious and it sounds like things are crackling in a really ugly way. Sometimes, though, it's hard to hear while it's happening, especially when you're listening on cheap headphones or monitors. But then when you listen back to your music on a better system, you suddenly realize that it's there. At that point you're stuck with it. This is why Pro Tools has a little red light at the top of each track meter to tell you when you are clipping.

Always take the time to set levels and make sure you're not clipping before you start recording!!!
Wednesday, December 3, 2008

Recording with Pro Tools (part 1)


So, hopefully today we will start to actually do some recording with Pro Tools. From here on out, every time you do any recording, I want you to think of yourself as an engineer. As an engineer, you are responsible for the quality of the recording. In this class, you are going to follow some basic steps to make sure you get good quality.

Here is my basic recipe for setting up a recording session.
  1. First, transfer your Pro Tools session to the instructor station and make sure it opens correctly. Note: All PT sessions should be saved to the folder called Student PT Sessions
  2. Create a new track (mono, audio) to record your performer on and label it something like "Vox 1".
  3. Create a second new track and label it TB.
  4. Attach the microphone to the mic stand properly.
  5. Adjust the mic stand so that the mic is the appropriate height, angle and distance from the performer. Always make sure that the front of the mic is facing the performer!!!
  6. Plug all XLR (microphone) cables and headphones into the appropriate spots on the Digi 003 (or mBox).
  7. Attach a talkback microphone so that you can communicate with the performer.
  8. Turn on phantom power (if appropriate).
  9. Record enable your tracks by clicking on the little red R button.
  10. Adjust the levels of the two mics with the microphone input (aka preamp) knobs on the Digi 003 so that you are getting a strong signal but not clipping.
  11. Adjust the performer's headphone level so that he/she can hear both him/herself and the beat.
  12. Adjust the level of your own headphones.
  13. Check with your performer to make sure he/she is ready and start recording!

Monday, December 1, 2008

Intro to Pro Tools - part 4

Pro Tools organizes all of the information and files that go into a session in a very specific way. It is important for you to know a little bit about it because you're going to be moving your recording sessions between computers and you may run into a situation where a certain file is missing and you will have to go and find it. Where do you look?

First, let's ask ourselves what happens when we create a Pro Tools session...

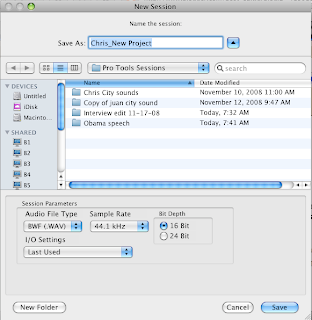
When first start a new session, this window pops up:

What you are doing in this window is deciding a couple of things:
  1. The name of the session
  2. What quality (Sample Rate, Bit Depth) you want your session to be (higher resolution = more memory required)
  3. What file format (AIF, WAV, MP3, etc.) you want the audio to be
  4. Where on your hard drive you want to store the session
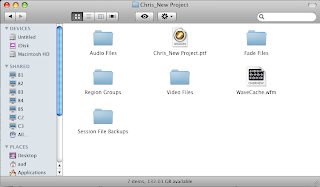
Then, once you hit "Save", Pro Tools creates a new folder containing some specific things. Take a look...
Here is the folder for my new session.If I go inside this folder, this is what I will see.

So what is all this stuff?
  • Pro Tools session file - this is the actual "file" that you open to work with Pro Tools. However, it doesn't actually have any audio in it. It's just a window that lets you work with files that are actually located somewhere else - sort of like one of those remote controlled robots that astronauts use.
  • Audio files folder - this is where all your recordings and imported audio is actually saved. This is folder is actually more important than the Pro Tools session file
  • Session file backups - Pro Tools periodically does an automatic save for you, just in case your computer crashes, or some catastrophe hits. You can load these files to recover your work.
  • Wavecache - This is basically a file that contains the regions in your session.
  • The other folders (Region Groups, Video Files, Fade Files) you don't need to worry about at this point. They all store information related so specific processes in Pro Tools that we will get to later. Just be aware that they are there!
The most important thing that you need to understand is this: a Pro Tools session file, which looks like this: is nothing by itself.

Key Point
When you are trying to move or back up a copy of your Pro Tools session, you must copy the entire folder that contains all the other folders inside it, especially the Audio Files folder!!!


Recording Projects - prep work

Today I want you to do a few things in preparation for working on your recording projects.
  1. Go into the Media Share>Class Materials>Project Worksheets and find the file called "Project Worksheet.odt". Copy it to your folder and open it. Please fill out this form so that Corina and I know what you are working on and can help you plan your project. IMPORTANT: be sure to save this file as "(your name)_Project Worksheet.odt", then copy it back to the Project Worksheets folder
  2. If you have a Reason beat that you are going to be recording vocals over, you need to get the beat into Pro Tools. To do this, you will have to Export audio files of all the individual instruments out of Reason and Import them into a Pro Tools session. (See below for instructions on how to do this.)
  3. If you need to finish writing lyrics, then please take time to do that today.
  4. If you still need to finish a beat, then do that.
So, everyone should have stuff to work on. If you need suggestions, ask Chris or Corina...

Click on the links for info on how to do the following:
Exporting Audio out of Reason
Importing Audio into Pro Tools