Today I want to talk a little bit about the other main aspect of sound: Amplitude.
More specifically I want to talk about what is called dynamics.
Dynamics is the way the amplitude (aka "volume") of a track changes over time.
Just like frequency content is really important to the sound of your music and the way it hits people, the dynamics can also really affect the way the listener responds to your music. Think about the difference between listening to an R&B love song and an angry heavy metal song; how do the singers sing differently? How are they using the dynamics of their voices differently? Why do you think they do that?
Now, generally speaking, it can be really useful to have the dynamics of an instrument or vocal change over time so that you can give a song more flow - the loud parts of a song will hit harder if you have a soft part right before them. However, sometimes, when you have a performance that gets too quiet in certain parts, it gets hard to hear it over the other instruments. This is especially a problem with things like vocals, which really need to be heard by the listeners.
Fortunately, we engineers have a tool for adjusting the dynamics of a track: compression!
What is compression?
The short answer is that it's a type of processing that allows you to automatically control the loudness of your tracks. The type of device that allows you to perform this magical processing is called (wait for it)...a compressor.
For example, say you have a vocal track where the MC's performance is at a pretty consistent level for most of the song, but then he/she suddenly gets really loud at one part. In this case, compression could be used to just turn down the loud part and leave the rest of the performance the same. This is what compression was originally used for...
But, in most modern pop music, a TON of compression is used on pretty much every track. I know of at least one major producer who says that compression is "the sound of modern music production." Why? Here are a couple of reasons:
1. To make things sound smooth (aka "clean").
2. To make things sound punchy (aka "slap").
3. To make the song loud.
So, if you want your song to have any of the above qualities, you should probably take some time to learn how to compress your tracks properly.
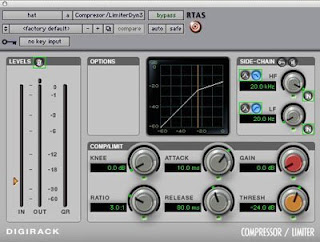
The basic concept is that you set a certain volume level on your compressor, called the Threshold. If the volume of your track goes over the threshold, then the compressor kicks in and turns down the volume until the signal goes back down under the threshold. The amount it turns the volume down by is called the Ratio. These are the two most important settings on a compressor - they tell the compressor when to start working and how much. Check it out...
 The next two settings you need to consider are the attack and release. The Attack tells the compressor how quickly to start working once the signal crosses the threshold. The Release tells it how quickly to let go once the signal goes back below the threshold.
The last setting you should know is the Gain, or makeup gain. This setting allows you to turn the overall volume of the track up. Why would we want to turn the volume back up when we just used the compressor to turn it down? Good question. The short answer: the slap factor. Think of the gain knob as the slap control. BUT, the slap control only really works if you've set the other settings properly.
Here is a picture of the Digidesign Compressor/Limiter that comes standard with Pro Tools software. It features all the controls we just discussed, plus a few that you don't need to worry about just yet. You can Insert this on any of your audio tracks:

Here is a general formula for compressing a vocal track:
1. Solo a vocal track and insert a compressor on it.
2. Set the Ratio to 4:1
3. Now adjust the Threshold until you see a maximum of about -6.0 dB of gain reduction happening in the column called "GR"
4. Set the Release to about 150 ms.
5. Now turn the Attack all the way to the right and slowly start turning it left (counterclockwise) until you hear the vocal just start to get muffled. Stop.
6. Now adjust the Release until you see the Gain Reduction moving nice and smoothly in time with the music. Close your eyes and listen. The volume of the vocal should sound pretty even and consistent. If you hear any sudden jumps, then you should try to adjust the Attack and Release settings until the jumps get smoothed out.
7. Turn up the Gain to 6.0 dB.
8. Hit the Bypass button to check what the track sounds like with the compressor on and off.
9. Now unsolo the track and listen to it in context with the rest of the song. Turn the bypass on and off to hear how the compressor is affecting the overall feel of the song.

No comments:
Post a Comment