Wednesday, January 28, 2009

Fundamentals of Sound (part 4) - dynamics/compression

Okay, so we have been talking about and working with a number of different aspects of sound, mainly dealing with Frequency (Harmonics, Filtering, etc.)

Today I want to talk a little bit about the other main aspect of sound: Amplitude.

More specifically I want to talk about what is called dynamics.

Dynamics is the way the amplitude (aka "volume") of a track changes over time.

Just like frequency content is really important to the sound of your music and the way it hits people, the dynamics can also really affect the way the listener responds to your music. Think about the difference between listening to an R&B love song and an angry heavy metal song; how do the singers sing differently? How are they using the dynamics of their voices differently? Why do you think they do that?

Now, generally speaking, it can be really useful to have the dynamics of an instrument or vocal change over time so that you can give a song more flow - the loud parts of a song will hit harder if you have a soft part right before them. However, sometimes, when you have a performance that gets too quiet in certain parts, it gets hard to hear it over the other instruments. This is especially a problem with things like vocals, which really need to be heard by the listeners.

Fortunately, we engineers have a tool for adjusting the dynamics of a track: compression!

What is compression?

The short answer is that it's a type of processing that allows you to automatically control the loudness of your tracks. The type of device that allows you to perform this magical processing is called (wait for it)...a compressor.

For example, say you have a vocal track where the MC's performance is at a pretty consistent level for most of the song, but then he/she suddenly gets really loud at one part. In this case, compression could be used to just turn down the loud part and leave the rest of the performance the same. This is what compression was originally used for...

But, in most modern pop music, a TON of compression is used on pretty much every track. I know of at least one major producer who says that compression is "the sound of modern music production." Why? Here are a couple of reasons:

1. To make things sound smooth (aka "clean").
2. To make things sound punchy (aka "slap").
3. To make the song loud.

So, if you want your song to have any of the above qualities, you should probably take some time to learn how to compress your tracks properly.

The basic concept is that you set a certain volume level on your compressor, called the Threshold. If the volume of your track goes over the threshold, then the compressor kicks in and turns down the volume until the signal goes back down under the threshold. The amount it turns the volume down by is called the Ratio. These are the two most important settings on a compressor - they tell the compressor when to start working and how much. Check it out...

The next two settings you need to consider are the attack and release. The Attack tells the compressor how quickly to start working once the signal crosses the threshold. The Release tells it how quickly to let go once the signal goes back below the threshold.

The last setting you should know is the Gain, or makeup gain. This setting allows you to turn the overall volume of the track up. Why would we want to turn the volume back up when we just used the compressor to turn it down? Good question. The short answer: the slap factor. Think of the gain knob as the slap control. BUT, the slap control only really works if you've set the other settings properly.

Here is a picture of the Digidesign Compressor/Limiter that comes standard with Pro Tools software. It features all the controls we just discussed, plus a few that you don't need to worry about just yet. You can Insert this on any of your audio tracks:
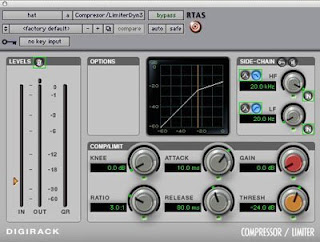

Here is a general formula for compressing a vocal track:
1. Solo a vocal track and insert a compressor on it.
2. Set the Ratio to 4:1
3. Now adjust the Threshold until you see a maximum of about -6.0 dB of gain reduction happening in the column called "GR"
4. Set the Release to about 150 ms.
5. Now turn the Attack all the way to the right and slowly start turning it left (counterclockwise) until you hear the vocal just start to get muffled. Stop.
6. Now adjust the Release until you see the Gain Reduction moving nice and smoothly in time with the music. Close your eyes and listen. The volume of the vocal should sound pretty even and consistent. If you hear any sudden jumps, then you should try to adjust the Attack and Release settings until the jumps get smoothed out.
7. Turn up the Gain to 6.0 dB.
8. Hit the Bypass button to check what the track sounds like with the compressor on and off.
9. Now unsolo the track and listen to it in context with the rest of the song. Turn the bypass on and off to hear how the compressor is affecting the overall feel of the song.


Monday, January 26, 2009

{Reason Assignment - Verse/Chorus}

Today I would like to have you all compose

Create a Reason beat that has all the following elements:
  1. At least 4 different instruments (only 1 Redrum, please!).
  2. Verse (16 bars) and Chorus (8 bars) sections.
  3. Copy the Verse and Chorus so that you have at least 3 of each.
When you finish making this beat, please save it as: (your name)_beat_012609

DAS recording review

So thank you to everyone who came through on Saturday for our class. I hope that you feel like you got something out of that class and learned something about the process of recording live instruments.

Thinking back on that experience, I want to talk as a class about that process and the role of the engineer.
  • What were some of things people found interesting or informative?
  • Mic placement - what did you notice about the sound, based on where the mic was positioned?
  • Engineer's duties - what were all the things we had to do/setup to make the recording happen?

Wednesday, January 21, 2009

Saturday class (1-24-09)

Here are the two groups for the class on Saturday. Remember that class will be from 10am-4pm. This will be a studio session and we have a limited amount of time, so please be on time! BAVC will be providing lunch.

Group 1 (meet at BAVC)
Rowvin
Robert
Taurean
Juan
Chris P.
Luis

Group 2 (meet at 410 Townsend)
Gio
Monica
Marisol
Victor
Tony
Monjaro

Fundamentals of Sound (part 3)


OK, after a little break, we're going to get back into talking about some of the properties of sound and see how they are actually applied to the music we make. One way to do this is to look at a common type of electronic instrument: the synthesizer.

What is a synthesizer?

Wikipedia says:

A synthesizer is an electronic instrument capable of producing a wide variety of sounds by generating and combining signals of different frequencies. There are three main types of synthesizers, which differ in operation; analog, digital and software-based. Synthesizers create electrical signals, rather than direct sounds, which are then processed through a loudspeaker or set of headphones.


So, basically, you've got a device that electronically generates one or more audio signals. And then by combining and processing those signals, you can create completely orignal sounds. There are several ways that different types of synthesizers operate. The simplest one is called analog, or "subtractive synthesis".

We are actually already familiar with the sounds of subtractive synthesis though working with our friend...

...the Subtractor!

So, obviously there is a lot going on with all these knobs and sliders and stuff. But once you know how to look at it, it really isn't so overwhelming. Today we're just going to focus on three sections, and from there you should know a lot about almost every instrument in Reason. The three sections are:

  1. Oscillators
  2. Filters
  3. ADSR Envelopes.
We'll start with the first: Oscillators.

Oscillators are basically the heart of the instrument. This is where the sounds originate from. The Subtractor has a handful of very basic types of sound waves that it uses as the raw material for creating instrument sounds. Think of these as the block of stone that a sculptor starts with before he/she starts chiseling it into a specific shape. Here are the most common types of sound waves that are found in pretty much any type of synth:
  1. Sine waves
  2. Square waves
  3. Triangle waves
  4. Sawtooth waves

Subtractor has two different oscillators that it can combine to create more complex sounds. Let's check this out for a second...(demonstration)

OK, so besides being able to play back two sound waves at the same time, Subtractor lets you adjust the pitch of each each one. What do you think that does to the sound? It also lets you add noise, if you're into that.

Next, we have the Filters.


So, if the sound waves are the block of stone that a sculptor starts with, then the filters are like the chisels and other tools that he/she uses to shape it into what he/she wants. Now filters are what put the "subtractive" into subtractive synthesis, and they are a really common audio production tool in general. Think about it, what does a filter do?

We've got four basic types of filters to choose from, and they all reject different parts of the frequency spectrum. They are:

  • Low Pass (LP)
  • High Pass (HP)
  • Band Pass (BP)
  • Band Stop (aka "Notch")
Remember, the key word here is "pass"; what frequencies are being allowed to pass through the filter? In a Low Pass filter, the "lows" are being allowed to "pass". In a High Pass filter, the "highs" are being allowed to "pass". Here, let me just show you... (demonstration).

So, in Subtractor, you can select whichever filter you want to work with by clicking on the red dot. Then you can adjust the Cutoff frequency (the point where the filter starts working) by dragging the slider called Freq.

OK, so the last section of the synth we're going to cover today is the ADSR Envelope.

ADSR just stands for: Attack, Decay, Sustain, Release, and it's referring to the way the volume of a sound evolves over time. Check out this picture of a waveform:


What it is showing is the different parts of the total sound. Briefly:
  • Attack - the quick rise of the volume up to the highest level.
  • Decay - the drop from the highest peak to the average level of the sound
  • Sustain - the average level of the sound
  • Release - the fade out; how quickly the sound cuts off when you let go of the key
Here is a common diagram of an ADSR Envelope:

Now, every sound has these four basic qualities, but with synthesizers, you can actually control the points that these things are happening. You can do this in the section called Amp. What do you think "Amp" is short for?

OK, so if your mind isn't completely overloaded yet, know that you can actually use ADSR Envelopes for more than just the volume of the soundwave itself. One of the most common things is to connect it to the Filter and have the filter moving in a completely different way than the Amplitude envelope. Bottom line: more interesting sounds.

OK, we'll cut the lecture off here today and get into actually making a patch from scratch. We're going to use the Subtractor to make our own kick drum sound. Please do the following steps and be sure to play a key on your keyboard after you do each step, so that you can hear what is changing!:

  1. Open Reason and create a new Subtractor.
  2. Initialize the patch (right click on the folder button)
  3. On Osc 1, select the sine wave. Set the Octave ("Oct") to 1.
  4. Make sure the Keyboard Tracking light is off.
  5. Find the Phase knob under Osc 1. Now find the three red lights to the right of the knob and click on the one next to the "-".
  6. Turn the Phase knob all the way to the right. (This is basically going to thicken up the sound.)
  7. Turn on the Noise generator and set the Decay to 40, Color to 0, and Level to 98.
  8. Go to the Filter 1 section and set the Frequency Slider to 64. Select the filter called LP12 by clicking the light next to its name.
  9. Now go to the Filter Envelope section and set A=0, D=40, S=0, and R=38. Turn the Amount knob to 65.
  10. Go to the Amp Envelope section and set A=0, D=34, S=0, R=40.
  11. Go to the Mod Envelope section and set A=0, D=36, S=0, R=30. Set the Amount knob to 70. Make sure that the Envelope Destination is Osc1.
  12. And you're pretty much done. Click on the Save Patch button and save this to your folder as "My Kick.zyp".


Monday, January 12, 2009

Guest Lecture: MC Do D.A.T.


Today's and Wednesday's classes will feature a special workshop on lyric writing and artistic perspective by Davin "Do D.A.T." Thompson. D.A.T. is a performer, educator, and veteran of the Bay Area hip hop community. He is a member of the Oakland-based group, The Attik, and has shared stages with a number of hip hop legends, including Dead Prez, Mistah F.A.B., E-40, and KRS-One. He recently dropped and is in the process of promoting his new EP, The Skinny (available through iTunes and CDBaby.com). He is BAVC's resident Lyric Coach.

Wednesday, January 7, 2009

Fundamentals of Sound (part 2)


Last time we got into some of the basics of sound, discussing the two main attributes:

Frequency and Amplitude.


Today we're going to get a little deeper into this stuff so that we can understand how it relates to the music we make using tools like Reason.

OK. So, frequency is basically dealing with pitch, right? How high or low a sound is. Measured in Hertz (Hz). Let's listen to a few tones to recalibrate our ears:

So what we were listening to were pure tones. Here is a picture of what a pure 440 Hz tone (aka "Concert A") looks like:
What we have been looking at and listening to so far are what are called sine waves. Sine waves are basically pure tones - nice and smooth and even, no additives or preservatives. But, as with so many things in life, reality is almost never so smooth and even...

Here is what Concert A (aka 44oHz) looks like when played by a grand piano:


Whoa. Lots of stuff going on here. I should point out that this picture is zoomed way out, so we're not seeing the individual waves like we were in the picture of the sine wave. But my point is this: there is a LOT more than just a simple 440Hz sine wave playing when you hit the A key on a piano.

Major point #1: Almost no natural sound contains only one frequency.

You might be asking yourselves then, "What are the other frequencies?"

Short answer: harmonics.

Harmonics are whole number multiples of a specific frequency.

OK, so I just lost about half the class with that last sentence. But it's really not that complicated. Check it out:


So, we're looking at the first 5 harmonics of a vibrating string. The first harmonic is what is called the fundamental frequency. The fundamental is like the "main note" being played. For example, in the picture of the piano note above, 440 Hz is the fundamental, but all that other stuff in the waveform is a bunch of harmonics:

1st harmonic (aka fundamental) = 440Hz
2nd harmonic = 880Hz (440 x 2)
3rd harmonic = 1320 Hz (440 x 3)
4th harmonic = 1760 Hz (440 x 4)
5th harmonic = 2200 Hz (440 x 5)

Every musical instrument has harmonics, but the amounts and combinations of these harmonics are unique to every instrument. This is why a guitar sounds like a guitar, a snare drum like a snare drum, Mariah Carey like Mariah Carey, etc.

Here is a comparison of a flute, a clarinet, an oboe, and a saxophone all playing Middle C (256 Hz):

As you can see, they are similar (they are all instruments from the woodwind family), but it is the unique harmonic content that gives each one a unique sound.

Major Point #2: Even though different instruments (including human voices) have different frequency ranges, most of them overlap.
Here is a chart that shows some instruments and their ranges (click on the picture to see a larger image):

For example, a violin, an MC's voice, and a snare drum may all contain a lot of the same frequencies. This is important to understand when you're mixing music because if you have a bunch of instruments all playing in the same general area of the frequency spectrum, it means that they are all competing for the listener's attention. So, what you want to do is give each one its own special spot in the mix. You do that by cutting certain frequencies and boosting others.

Cutting and boosting- that's the basic concept. Now let's talk about the tools you have to accomplish this. There are basically two types of EQ that you use in mixing:

1. Shelving EQ - This is simple. With a shelving EQ, you're just boosting or cutting everything above or below a specific frequency. This is a more general tool that lets you make adjustments to big sections of your sound. You will generally have one for dealing with the High Frequencies, and one for the Low Frequencies. Here's a chart:
2. Peaking (aka Parametric) EQ - This one let's you zero in on a very specific frequency range to cut/boost. This is a more precise tool for working with really detailed parts of the sound. Generally, you will have a couple of these that are meant to be used in the Low-Mid and Hi-Mid ranges. Here's a chart:


This is what the Digirack EQ plugin that comes with Pro Tools looks like:


Notice that there are five sets of EQs. The middle three sets are all Peaking EQs. The ones on the far left and far right can be EITHER Peaking or Shelving, depending on how you set them. They will normally be set to Shelving.

Really knowing how to EQ is an art form and, just like any other art, takes years of practice to really master. Just remember:

LESS IS MORE. Something that is recorded halfway decently should not need more than a little EQ adjustment. Anything more than +/- 6 dB is a pretty big adjustment.


Here is your assignment for today:
  1. Pick 2 tracks from your song that have a similar frequency range (like 2 low instruments).
  2. Insert EQs on each of them.
  3. Work with one track at a time: solo it and loop it.
  4. Using a Peak EQ, narrow the Q to about 6 and boost the Gain to about 12 dB.
  5. Now sweep the Frequency from high to low and pay attention to what frequency range gets louder when you sweep through it.
  6. Lower the Gain back down.
  7. Now solo the other track and pull up the EQ
  8. Using the Peak EQ, find the same frequency range and lower the gain on that track just a little bit, like -3dB.
  9. Listen to both tracks together and see if you can hear the first track popping out just a little bit more now. Try adjusting the Q and the Gain to make it sound right.
  10. Pick two more tracks and repeat the same process.

Monday, January 5, 2009

Filtering assignment

Today we're going to start working a bit with frequency using a type of processor called an Equalizer (aka "EQ").

"What is an EQ?" you ask.

Well, an
EQ lets you boost or cut a specific frequency ranges in your tracks.

"Why would you want to do that?" you ask.

Well, because generally you want certain things to stand out more in your mix, and other things to be more in the background. Cutting/boosting certain frequencies can help you do this. Also, you can make things sound cleaner and clearer. It's sort of like having a toolkit for working on the details of your tracks.

Today we're just going to work with a very basic form of EQ-ing, called filtering.

Filtering lets you completely cut out a certain frequency range and just leave the remaining part. I want for you to see what it sounds like when you filter your own voice. Basically, we're going to use filters to make our voices sound like they are coming through a telephone.

Please do this:
  1. Open your Pro Tools session.
  2. Pick a vocal track that you want to work with. Solo it by clicking the yellow S button.
  3. Pick a specific region and loop it. Hit play.
  4. Go to the Mix Window.
  5. In the dark grey section at the top of the track, click on one of the sets of double arrows.
  6. Click on Plugin>EQ>7-band EQ3
  7. In the sections called HPF and LPF, click the IN buttons.
  8. Now find the spots where it says 6dB/Octave. Turn up the knobs until it says 12dB/Octave.
  9. In the HPF section, turn up the Frequency knob until your voice starts to sound kind of thin. Make a note of what frequency this happens at (about 1kHz).
  10. Now in the LPF section, turn down the Frequency knob until the voice starts to muffle a little and sound more like it's coming through a phone. Note what frequency this happens at (about 2kHz). The frequency screen should look something like this:
  11. Play around with all these knobs and other parts of the EQ and see how they affect the sound of your track.

Fundamentals of Sound - part 1

Welcome back! Hope you had a restful/exciting break and are ready to get back into the wonderful world of audio.

So far we've discussed a bunch of different topics, from music theory to hip hop history to navigating software. Today we're going to talk a little about some fundamental audio concepts.

What is sound?

On the most basic level, sound is the vibration of molecules. Since we live in an air-filled atmosphere, sound for us is usually the vibration of air molecules.

Whenever there is any kind of movement or friction or impact in our air-filled environment, the air molecules get compressed and are pushed out of their normal position. They then react by springing back in the other direction. Same concept as a pulling a piece of string tight and then plucking it; the molecules swing back and forth.

It's important to understand that these vibrations don't just stay fixed in one place; as the vibrating molecules get pushed out of place they bump into their neighbor molecules and cause those molecules to vibrate, causing their neighbors to vibrate, then those molecules bump into their neighbors, and so on. Basically, the vibrations spread out in all directions in waves, sort of like dropping a rock in a pool of water. This is how the sound gets to your ears. The waves move outward at a steady rate, but get weaker and weaker as they move farther and farther away from the source...


If we try to draw a picture of a sound vibration, we get something like this:
A picture like this is called a waveform.

If we zoom in really close, then we see somthing like this:


What this diagram is showing you is a single cycle of a sound, and in this picture we can see the two basic aspects of sound, which brings us to the main point of today's lesson...

FREQUENCY and AMPLITUDE!!!

On the most basic level, here is what you need to understand:

Frequency = pitch (Hz)

Amplitude = loudness (dB)

Now, more specifically, frequency is the number of cycles that happen in a single second. The faster the vibrations are, the more cycles are happening per second, the higher the pitch. In the waveform diagram above, the horizontal axis is showing frequency. The closer the cycles are to each other, the higher the pitch and vice versa.

The unit of measurement of cycles per second is the Hertz (Hz).

Amplitude is a little trickier to explain, but basically it is the amount of energy that is going into making the sound. In a waveform diagram like above, the height of the wave is showing you how loud the sound is.

The unit of measurement of amplitude is the decibel (dB).

Last and SUPER IMPORTANT thing to know for today:

The human range of hearing is approximately 20Hz to 20,000Hz.

With this information, we can start to get into really working with sound. Tune in next time for the wonderful world of harmonics, folks!