Monday, October 27, 2008

NNXT - Exploring the sounds of the Orchestra

So today I want to talk a little bit about the different families of instruments that you can find in an orchestra and get familiar with the types of sounds that are available to you through Reason instruments, such as the NN19, NNXT and Combinator. Keep in mind that just because orchestral instruments are traditionally used to play classical music, that doesn't mean that they can't be incorporated into hip hop and other forms of music. Here is an example of a famous beat that combines orchestral sounds along with more modern sounds like synthesizers, drum machines, etc.:

Whats The Difference (Instrumental) - Dr. Dre, Xzibit, Eminem

An orchestra is just a group of instruments, usually grouped together to play classical music. The size of an orchestra can range from under 50 musicians to over 100. Take a look at how the orchestra is laid out in the diagram above. Why do you think the different categories of instruments are placed where they are?

You should be aware of this general rule:

The larger an instrument is, the lower the pitch of the sound it can make. The smaller the instrument, the higher the pitch.

For our purposes, I just want you to know the four main families of instruments found in an orchestra because it will help you to know where to look for certain types of sounds when you are making your own music.

The four families of orchestral instruments are:
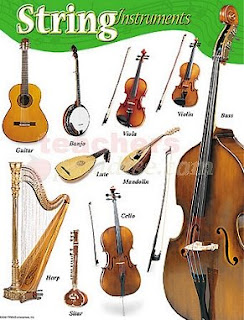
  1. Strings - These are all the instruments that have strings. They are usually played with a bow, though sometimes they can also be plucked. Instruments in the string family typically include double basses, cellos, violas and violins. You could also throw guitars and harps into this category.
  2. Brass - These are metal instruments that you blow into. They tend to be extremely LOUD with a sharp tone that can cut through all the other instruments! Common instruments in the brass family include tubas, trombones, french horns and trumpets.
  3. Woodwinds (aka "Reeds") - These are also instruments that are blown into, though unlike brass, they make sounds by having a thin wooden reed in the mouthpiece that vibrates when you blow on it. Most woodwind instruments (but not all) are made out of wood and have a mellower sound than brass instruments. Common woodwinds are oboes, clarinets, bassoons and flutes. Interestingly, saxophones also are considered woodwinds. Why is this interesting?
  4. Percussion - These are instruments that you bang on, either with your hands or special sticks! Typically, they are used to make really loud statements at certain parts of the music. They include all kinds of drums and cymbals and gongs, but they can also include melodic instruments like xylophones and glockenspiels, which are played with sticks called mallets.


Now let's hear what a whole orchestra playing together can sound like...


Assignment:


Real simple. You're going to make a beat that uses instruments from each of the orchestral families of instruments using the NNXT Sample Player.
  1. Open Reason and start a new file (File>New)
  2. Create a Redrum and take no more than 15 minutes to make a beat (32 Steps please!)
  3. Create 4 NNXT samplers
  4. Load sounds from each of the 4 orchestral families and make a beat that is at least 24 bars long. You can only use sounds from the following folders: Brass, Mallets, Orchestral, Reeds and Pipes, Strings)
  5. Save it to your folder as "(your name)_orchestral.rns" and put a copy in the Media Share folder (Media Share>Student Work>Orchestral Beat)
Having trouble knowing where to start? Keep in mind that just because you're using orchestral instruments, it doesn't mean that you have to write a symphony! You're still just making beats here. Here are a few tips on where to start.
  • Start by browsing through different sounds until you find one that sounds cool and get inspired by that. Make a main melody using that sound and just add little touches with the other instruments
  • Try changing the octave on your keyboard to change the pitches of the sounds. Certain instruments (like flutes and violins) sound better in higher octaves, while others (like tubas and cellos) sound better lower.
  • Strings tend to be good for making long, rich sounds. Try holding the keys down for a while.
  • Brass tends to be better for short, sharp sounds. Try playing quick little hits on the keys.
  • Reeds can go either way. Try playing either short or long notes and see what sounds better.

Wednesday, October 22, 2008

Recreate a beat (part 2)

For the last part of this lesson, we're going to record ourselves playing the synth melody for "Dumb It Down".

1. First, create a Subtractor.
2. Now load the following sound:  
Reason Factory Sound Bank>Subtractor Patches>MonoSynths>Rave Lead.zyp.
3. Now let's find the notes used in this melody. They are 
CA flatB flat, and F.
4. Set your Loop Markers around the first 4 bars of the beat (L on Bar 1, R on Bar 5).
5. Listen to the beat on You Tube for a bit to get a feel for when then notes are played. Notice that the last note is held for a long time. The whole melody is a total of 4 bars long.
6. Now switch back to Reason make sure that the Loop On/Off button is lit up in the Transport Window. Hit play and practice playing the melody over the beat.
7. When you are ready to try to record it, hit Record
. Don't feel pressured to start playing right away. You can let it play through the loop once and then start playing when it comes back around.
8. When you're done, press the Record button again, or Stop if you want to stop.
9. How's your performance? Tight? If so, then go ahead and Copy and Paste this Loop for the whole 16 bars.
10. 
Save it as (your name)_Dumb It Down.rns
11. Put a copy on the Media Share folder in Student Work>Dumb It Down

If your performance was not tight, however, Reason can help you through the miracle of Quantizing...

1. Make sure that your new Region is highlighted
2. Go over to the 
Tool Window and click on the Tool tab.
3. In the section where it says 
Quantize, hit the Apply button. What happens?
4. So you may need to fine tune some of the notes even more.
5. To do this, double click on the Region and scroll up or down until you find your notes.
6. Listen to it play back and try to spot where the problem notes are.
7. Click and drag the note in the appropriate direction until it sounds like it's in the right place (make sure that you're only moving one note, and not all of them!)
8. Drag the right edges of some of the notes to be long enough.

Save it and you're done.

Recreate a beat (part 1)

Last time we got into the wonderful world of bass lines and worked to recreate our own version of the bass line for "Blow the Whistle".

Today, we're going to take our listening skills even further and remake both the drums and the melody from a song by Lupe Fiasco.

We're going to listen to listen to the actual song, but first let's review some important concepts.
  • What is a bar?
  • How do you know how to count the number of bars in a song?
  • What drum sound can you listen for to help you count?
OK, so now let's check out Lupe's Song and listen critically to what's happening in the beat. Specifically, I want you to count out how often the drums are switching up and what is changing when they switch.

Alright, so now that we're familiar with it, let's recreate those drums...

Step 1:
1. Launch Reason and create a new session (File>New)
2. Right off the bat, let's give this a file name
"(your name)_Dumb It Down.rns" and save it into our folders:
(File>Save As>My Documents>ADP Audio1 Chris Runde>Reason Stuff>
Dumb It Down_your name)
3. Now let's set the tempo to 95 BPM.
4. Create a Redrum Drum Machine.
5. Now let's load some drum sounds into the machine. I want you to load individual drum sounds, not kits! In case you forgot, individual drum sounds can be found under:
Reason Factory Soundbank>Redrum Drum Kits>xclusive drums-sorted

Here are each of the four files I want you to load into the first four slots of your Redrum:

Slot 1 - BassDrums>Bd3_Riot.aif
Slot 2 - Bass Drums>Bd_Xtc7.wav
Slot 3 - SnareDrums>Sd2_HardKnox.wav
Slot 4 - HiHats>Hh_Xfile2.wav

6. Now that we've got our sounds loaded, we can begin to build our first drum loop. Let's start with the snare...
  • Press the Select button at the bottom of Slot 3 (Sd2_HardKnox) and put the snare on squares 5 and 13.
  • Next, hit Select on Slot 1 (Bd3_Riot) and put the bass on squares 1, 3, 4, 8, 10, and 12. Starting to sound like an actual beat, right? Now, for the final touch let's add some hi hat...
  • Hit Select on Slot 4 (Hh_Xfile2) and in the sequencer, click on squares 1, 3, 4, 5, 7, 8, 10, 11, 15, and 16. Sounds fairly close to the real song, right? Sorta? Kinda?
7. OK, now we need to get the loop down into the sequencer window using Copy Pattern to Track

Now we're ready to make the second part of the beat, which is basically exactly the same as the first part of the beat, except that one drum switches up. So instead of recreating the whole thing from scratch, we're going to just copy our first pattern and change the bass drum

1. Click on Pattern 1 in the Redrum.
2. Go to Edit>
Copy Pattern
3. Now click on
Pattern 2 in the Redrum
4. Go to Edit>
Paste Pattern
5. Click the Run button to listen to the pattern. 
6. Now click the Select button at the bottom of
Slot 1 and make a note of all the notes that are lit up (1, 3, 4, 8, 10, 12). Click on each of these and turn them off.
7. Now click Select on
Slot 2.
8. Click on all the same notes that were previously lit up in Slot 1.
9. Hit Run to listen to the new beat.

Now let's get the new pattern down into the sequencer.

1. Set the loop points to mark off one bar: 
L on bar 3R on bar 5.
2. Click on the Redrum track on the left of the Sequencer window.
3. Click on
Pattern 2.
4. Go to Edit>
Copy Pattern to Track.
5. Click on Enable Pattern Section to make sure you don't play back two copies of the beat.
6. Hit play and make sure it's playing back right.

So now you should have a full 4-bar loop. Move your Loop markers to loop the whole thing:

Put the L on Bar 1, and the R on Bar 5.

Hit play and listen to the sweetness of the beat.

SAVE.

In the next lesson, we will be moving on to the melody...


Monday, October 20, 2008

Bass Lines


A bass line is the low sounding part of a song that works with the drums to create a rhythmic pulse.
Before people started using electronic instruments (like Reason) to make music, the bass line was usually played on a bass guitar:
So to get a clearer idea, let's listen to the following song, "What's Going On" by Marvin Gaye for a minute. Try to focus on the low-pitched part of the song.


Now let's listen to what just the bass line alone sounds like from that same song...

It used to be that the bass line was just a supporting part of the song, not the main thing that people were listening to. But then in the 70's when music styles like soul, funk and reggae started becoming popular, the bass started to play a bigger role. Then by the time hip hop became really big in the 1980's, artists started putting a LOT of bass in their songs so that sometimes it was the main part of the music that people were listening to.

So, to get a better understanding of what bass lines do and how we can use them in our own music, we are going to remake the bass line from Too Short's single "Blow the Whistle" then recreate the drum beat. Default-tiny Too Short- Blow The Whistle (instrumental) uploaded by 2104-tiny beanycastillo
  1. Create a new Reason file.
  2. Set Tempo at 100 bpm
  3. Create a Subtractor
  4. On The Subtractor, click on the folder in the upper left hand corner.
  5. Go to Reason Factory Sound Bank>Subtractor Patches> Bass>Dodger Bass.zyp
  6. Now let's add the Bass line from Blow the Whistle, which is in Eb Minor!
  7. Move your Right Marker to Bar 3.
  8. I'll show you how to play the bass line. You will be playing the following keys: C, Eb and Gb.
  9. After you feel like you have the part under your fingers, record it and quantize it.

  10. Create a Redrum.
  11. Listen to the Instrumental of Blow the Whistle.

  12. What sounds do they use?
  13. What boxes do you think they go on?
  14. Recreate the drum beat from Blow the Whistle.
  15. Copy Pattern To Track.
  16. Save as "(Your Name)_Blow the Whistle.rns".

Wednesday, October 15, 2008

Keyboarding Basics: the Minor Scale

Alright, so it's been a week or so since we worked on our keyboard knowledge, but I want to get back to it for a minute so that you can expand the range of sounds you have to use when you are making your own music.

I would like to introduce you to my friend, the Minor Scale.

First, lets quickly refresh our memory of the Major Scale. Here is the formula, in case you forgot:
W-W-H-W-W-W-H

Now, here is the formula for the Minor Scale:

W-H-W-W-H-W-W


Do you notice anything about how these two formulas are related?

Now let's see how this formula looks on an actual keyboard. Here are the notes of the C Minor Scale...


Assignment #1:
  1. Open a new Reason file.
  2. Create a Subtractor Analog Synthesizer.
  3. Load a sound from one of the four main categories (Bass, Monosynth, Pad, or Polysynth).
  4. Set the L marker on Bar 1 and the R marker on Bar 5.
  5. Turn on the Click (aka metronome) and set the tempo to something you like.
  6. Practice playing the C Minor scale up and down in time with the metronome: (C-D-Eb-F-G-Ab-Bb-C-C-Bb-Ab-G-F-Eb-D-C)
  7. When you've got it down, hit the Record button and record your performance.
  8. Fix any off notes by quantizing.
  9. Save the file to your folder as "(your name)_C Minor scale.rns"
  10. Put a copy of the file on the Media Share folder in: Media Share>Student Work>Minor Scale
Now, I want you to try applying the Minor Scale to making your own original beat.

Assignment#2
1. Pick a key you want to start with.
2. Figure out the notes of the Minor Scale starting from that key. Remember the formula: W-H-W-W-H-W-W
3. Now spend some time making an original drum beat so that you have something to play over.
4. When you've got a beat, set your L marker on Bar 1 and your R Marker on Bar 5.
5. Create either an NN19 or a Subtractor and load a sound that you want to work with.
6. Listen to your beat playing and start experimenting with playing some notes from the Minor Scale that you picked. Keep it simple; just 3-4 notes are fine.
7. Practice playing your melody. When you've got it down, hit the Record button and record yourself playing.
8. If you need to fix any notes, use the quantize function.
9. Create another NN19 or Subtractor and load a sound that you think will go well with the sound you've already got.
10. Add a few more notes over what you've already recorded. These notes should also be from the Minor Scale that you picked earlier. Again, keep it simple - just a few notes is fine.
11. When you've got some sounds for both of your instruments, start copying and pasting your melodies to make a longer song.
12. When you've got something that you feel is solid, save it as "(your name)_Minor beat" and let the instructor check it out.


Monday, October 6, 2008

History of Hip Hop Production (Breakbeats)


Last week we got into working with the Redrum and became familiar with a very important piece of equipment in modern music production: the drum machine.

Today we're going to take a minute to talk about another piece of equipment, the sampler, and a concept that changed the way music is made: breakbeats.

First, we are going to check out a Powerpoint presentation I made to help explain the history of hip hop production. If you want to refer back to this at any point, you can find the file at:
Media Share>Class Materials>Hip Hop Production_powerpoint.ppt.

As we learned just learned, breakbeats were the parts of old school funk and soul records where all the instruments would drop out except for the drums. This where people would really freak out and go off dancing.

Kool Herc figured out that by having two copies of a record, he could extend the breakbeat for as long as he wanted, playing one record, then the other, then rewinding the break on the first record, etc. Some people would say that this was the real start of hip hop as a new, distinct style of music, using the breakbeat as the backbone of the whole genre.

A few years later, when samplers became affordable and had long enough sampling times, people were able to just record the breaks into the samplers and have them loop automatically for however long they wanted.

Today we're going to get into working with a particularly famous break from a song called "The Funky Drummer", by James Brown.

Let's listen to the original for a second...

Funky Drummer

So now we're going to work on getting the break into our own songs so that we can use it.

But first...

Disclaimer: Sampling other peoples' work without their permission is a violation of copyright laws. If you are merely sampling for your own educational purposes (like we are doing in this class), then you should be fine. BUT if you intend to create and SELL music that incorporates samples of other artists' work, you are legally required to get all necessary permissions from the owners for the use of those samples. Think about it...how would you feel about someone taking your music without your permission and then making money off it?

That said, check it out...

1. First, let's grab the sample you're going to be working with and copy it to your hard drive. Go to Media Share>Class Materials>Samples and find the file called "Funky Drummer_break.wav". Copy that into your folder on your hard drive.
2. Now create a new Reason song called "(your name)_Breakbeat lesson 1.rns".
3. Create an NN19 sampler in your rack and make sure it is connected to the Mixer.
14:2. 4. Click on the Browse Sample button at the top of the NN19.
5. Load the Funky Drummer_break file into the sampler.
7. So what we've got here is a 1-bar drum break. In order to make it line up with everything else in your song, we've got to make the tempo of the song fit with the tempo of the break, so...first, set your L and R markers so that they are marking off a single bar (put the L on Bar 1 and R on Bar 2).
8. Now hit Shift-Tab on your keyboard to go into the Edit View of your NN19 sequencer track (the part that shows the keyboard and notes).
9. Click on the Pencil Tool.

10. Find key C3 and draw a note that is exactly one bar long.
11. Make sure the Loop On/Off button is lit up, then hit play and listen to the loop. What is happening?
12. Now let's adjust the tempo so that the sample loops perfectly...Lower the tempo until you get down to 101 BPMs. Sounds good, right?
13. OK, so now we've got something that we can work with.
14. Switch over to the Arrange View (hit Shift-Tab).
15. Now we're going to mark this sample loop into a group. Using the Pencil Tool, mark off 1-bar. You should now have a region that you can copy and paste as many times as you want in the song.

From here, you can go ahead and create a Redrum drum machine and start making a beat that can either go over the loop, or switch off parts with it. You might also want to try playing with the Filters on the NN19 and seeing how you can switch up the sound of the loop.

Your assignment:
Create a song that is at least 24-Bars long that incorporates both the drum break and the your own original Redrum drum pattern (32-steps).

Advanced folks -
If you want to challenge yourself, have the break play back at a pitch other than its original pitch - meaning a key other than C3. You will have to adjust the tempo to make this work out right. When you're trying to match the tempo, if you hear the loop getting cut off too soon, then the tempo is too fast. If you hear a gap at the end of the loop before it starts playing again, then the tempo is too slow.


Wednesday, October 1, 2008

Beats & Bars & Kicks & Snares (oh my)

So now we've started to get into making our own beats, we need to go over a couple of concepts so that we can understand each other when we talk about music.

Here are a few musical terms that I want you to know:
  • Beat - A unit of counting musical time. Think of them as "seconds".
  • Bar - A group of beats (usually 4). Think of them as "minutes".
  • Tempo - The speed of a piece of music.
The Drums
If you want to talk about beats, then you have to talk about drums. And if you want to talk about drums, then it is important to understand a little bit about what the different sounds are and what role they play in making a drum beat.

Take a look at the picture of a standard drum kit below:

Out of all the different parts, the three most important ones are:

1. the Snare
2. the Bass Drum
(aka "Kick")
3. the Hi Hat

These three instruments hold down the core of the beat, while all the others just add extra excitement at certain times. In general...

The Snare holds the beat steady. That's why it usually hits steadily on the 2 and the 4. In hip hop, a clap or snap can serve the same purpose.

The Bass (aka Kick) drum defines the rhythm and tells you when to nod your head! That's why you almost always hear the Bass on the first beat of the bar ("the 1")

The Hi Hat accents the rhythm and adds flavor to the overall feel of the beat. One important thing to know about the Hi Hat is that it can open and close. When it's closed, it makes a nice, tight sound ("tick, tick, tick"). When it's open, it makes a loud ringing sound ("TSHH!")

Let's take a look at this video of a guy playing the drums. Pay attention to which instruments he's hitting and what kinds of sounds they make. Try to count along with him (1,2,3,4) as he plays, remember: the snare hits on the 2 and the 4!

click here

Now that we know something about how real drums are played, we can apply this information to making our own beats using the Redrum. Right now you're going make up a beat for a famous song called, "Calabria".

  1. Double click on the Macintosh HD icon on your desktop.
  2. Double click on your folder to open it.
  3. Now find the Media Share icon on your desktop to open it.
  4. Go into the folder called Class Materials.
  5. Find the file called "Calabria.rns" and drag it into your folder.
  6. Once it is transferred into your folder, double click on the file to open it.
  7. Hit the Spacebar to listen to the melody. Recognize it?
  8. Make a beat that goes along with this melody. Remember to look for different sounds and find ones that work for you. Try to mix it up and give it your own style. Try changing the tempo to make it faster or slower than it is right now.
  9. Now make a second beat on Pattern 2 in the Redrum.
  10. Copy the first pattern to the track in the Sequencer Window from Bar 1 to Bar 9, then have the second pattern come in from Bar 9 to Bar 13.
  11. Copy the melody so that it plays over your first pattern (Pattern 1) and then stops for the second pattern. (Hint: Hold down the Option button and click and drag your pattern.)
  12. Show the instructor when you are finished.